
Crop Planning and Rotation: Seasonal Turnover to Maximize Production
Crop planning is a fantastic first step in setting your flower farm up for the season, but how do those plans hold up once reality hits?
Mapping out sow dates and planning successions is relatively straightforward on paper. The real challenge begins with growing bed assignments and managing the flow of each bed throughout the season.
You might find yourself asking:
How do I know what to plant and when, to ensure I have flowers available all season long?
How do I predict when each crop will be ready to turn over?
How can I tell when a crop should be removed, even if it’s still producing some blooms?
These are common concerns, especially if you're a new or small-scale grower trying to keep those rows in continuous production. Without firsthand experience of each crop’s life cycle and harvest window, it can feel overwhelming. Even seasoned growers find that the unpredictability of seasons and crop behaviors keeps things interesting!
The reality is, bed layout and crop rotations are far from one-size-fits-all in flower farming. Just as you can’t copy-paste a master crop plan, there’s no universal template for bed rotation. We each work with unique conditions: our land sizes, climates, markets, demand, and personal schedules. Your crop rotation is an extension of your crop plan, tailored to your flower farming setup.
In this post, I’ll walk you through some fundamental crop rotation concepts and share practical tips to help you get a handle on bed rotations. My goal is to give you a solid starting point, so you can go into the season with confidence and refine your approach over time as you learn the rhythm of your own field.

We love zinnias at Sierra Flower Farm! They’re a quick-growing crop that thrives even in our shorter season and definitely deserves a couple of planting rounds. Incredibly prolific and a true workhorse in the field!
You Are the Composer of Your Flower Field
Pulling together your crop plan and setting the field in motion is much like composing a piece of music. There are crescendos, decrescendos, and little moments of magic out there. As the conductor, you’re bringing in each section of your “orchestra” in perfect time, creating harmony by keeping every part moving together for the best overall effect.
Our goal is never to have every row at peak production at the same time. Instead, we aim for a natural rhythm of crops at different stages: some just starting, some actively growing, some ready for harvest, and some nearing turnover to begin the cycle again.
At first glance, this might make your head spin as you go through your crop plan at the kitchen table. But it’s less complicated than it seems. Once you’ve gone through at least one full season, you’ll start seeing the rhythm. By taking good notes and recording your experiences, the process will become even easier and faster in future years.
You’ve got this, and we’re here to help you conquer it!
Where to Begin? Start with the Bed Hogs!
When mapping out growing beds and rotations for the season, I like to begin by identifying my “bed hogs.” These are crops that occupy beds for the long haul—but they’re worth it!
I start by labeling my bed sheets with all the bed hogs. So, what exactly qualifies as a “bed hog”? Bed hogs are usually perennial crops like peonies, thornless raspberries, and other woody plants. They can also be crops that we treat as perennials (though they could technically be grown as annuals) such as dusty miller and eucalyptus.
There are also crops that, due to our setup and climate, I can’t squeeze spring plantings around—dahlias and lisianthus, for example. These cultivars go into beds mid-spring and stay there until the first frost.
Finally, some varieties become bed hogs by design because of their productive nature. For example, strawflowers produce all season, but I like to plant them in multiple successions within the same bed. This approach allows me to harvest weekly rather than waiting for a new round to bloom. By grouping these successions in one location, I make harvesting and crop planning much more efficient. I also let strawflowers claim space as bed hogs because they’re a top choice for our everlasting products, making them indispensable!
Once I have my bed hogs mapped out, I know exactly how many beds I have left to rotate crops throughout the season.

Here at Sierra Flower Farm, lisianthus are one of our biggest bed hogs, both in greenhouses and out in the field! These beauties are sown from seed in winter, transplanted in early spring, and bloom from late summer until the first fall frost.
Mapping Out the Remaining Growing Beds Using the Rule of Thirds
If you’re still learning the ropes of plant life cycles and harvest seasons, I recommend using the “rule of thirds.” After laying out all the bed hogs, divide the remaining growing beds into three parts.
This approach provides flexibility and allows for rotations across different seasons. At the start of the season, aim to allocate one-third for spring harvest, one-third for summer harvest, and one-third for overlapping successions, cover crops, or a silage tarp. This last third gives you some much-needed wiggle room.
As the season moves forward, your thirds will naturally shift, with one-third for summer harvest and one-third for fall harvest. The final third remains flexible and can be used for late successions, cover cropping, or planting overwintering crops for the following spring.
The breakdown isn’t as simple as just “spring” and “summer.” Within each season, there are early, mid, and late harvest crops. For example, in early spring, we start with tulips, and as it warms up, we move into ranunculus. This staged approach means that rows won’t be ready for harvest all at once and will open up gradually. As soon as a bed is done, we turn it over and replant to keep the cycle moving.
Let’s walk through how this “flow” of growing beds works across the season.
Side note: Your rotation and timing may vary depending on your climate and frost dates. [link demystifying blog]


Growing with the Flow
Now that you have a grasp of your first round of crops and bed hogs, it’s time to get into the flow of each growing bed across the season.
The First 1/3: Spring Harvest Growing Beds

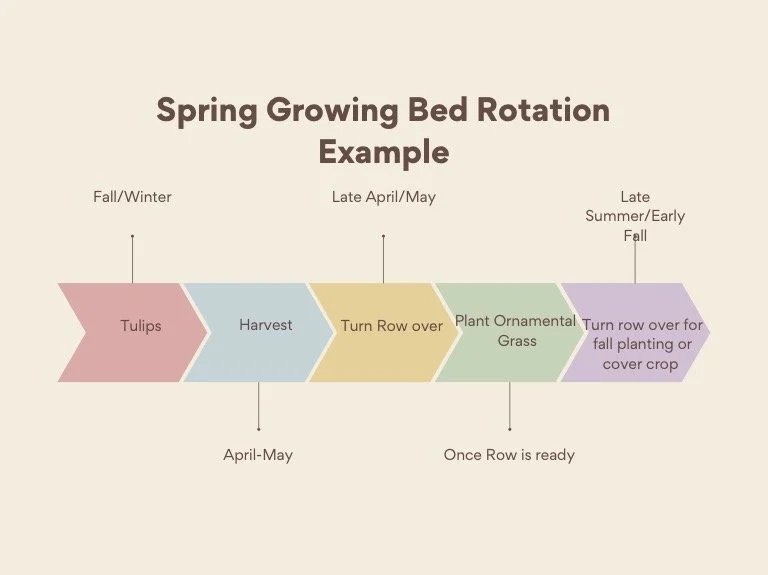
The first third of your growing beds should focus on early spring bloomers, planted in fall or winter, and typically finishing up around April to June. This turnover gives you the chance to plant warm-loving crops shortly after.
For example, by early May, after we’re done harvesting tulips, we open up that bed to plant ornamental grasses like frosted explosion. These grasses take a while to establish, so getting them in early means we can start harvesting by July. Low tunnels are useful at transplant time, especially in unpredictable spring weather. Most ornamental grasses—like bunny tails and feathertop—are harvestable from summer through the first fall frost, meaning this bed won’t need another turnover until the season’s end.
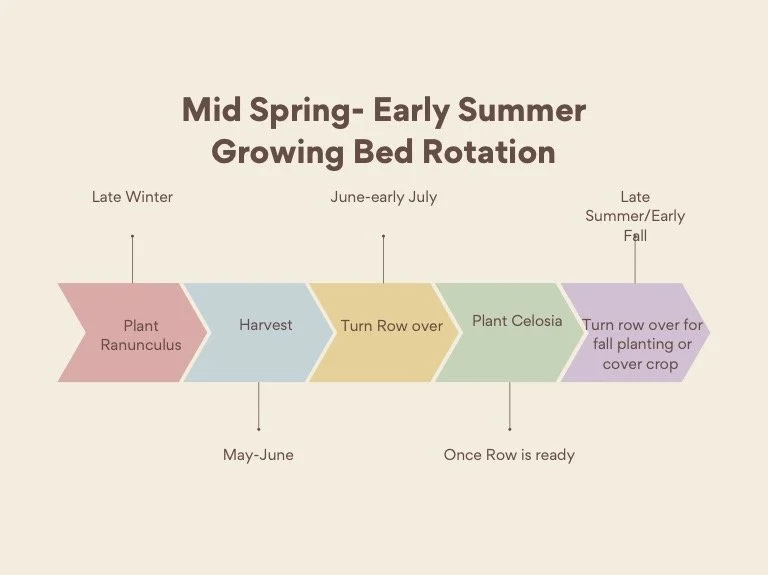
Since tulips are one of the first crops to finish, it’s helpful to follow them with longer-growing varieties. Other good choices include celosia (with tunnels), feverfew, or even dahlias if you don’t mind waiting until mid-May. Need blooms quickly? Sunflowers are also a solid choice. For example, we plant ranunculus as a cold-hardy option in late winter, harvesting mid-May to early June. Once it’s spent, we plant celosia in mid-June, allowing us to make the most of the space as summer hits.
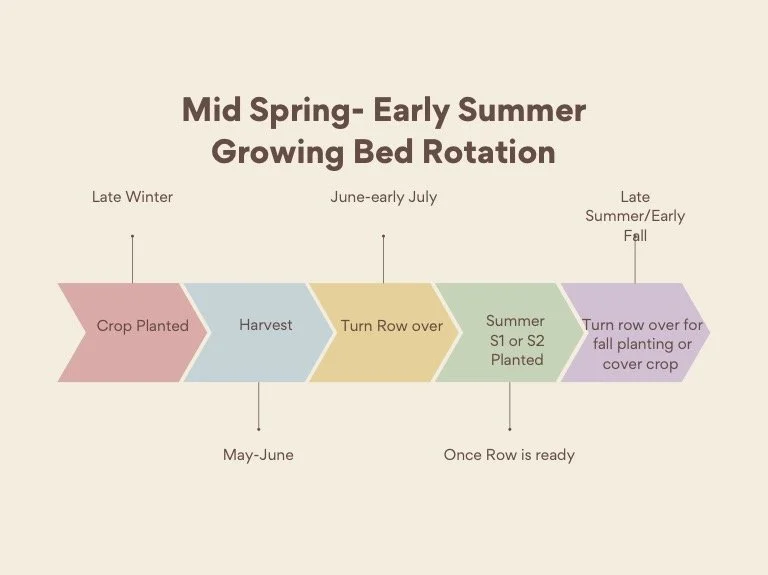
The Second 1/3: Summer Harvest Growing Beds

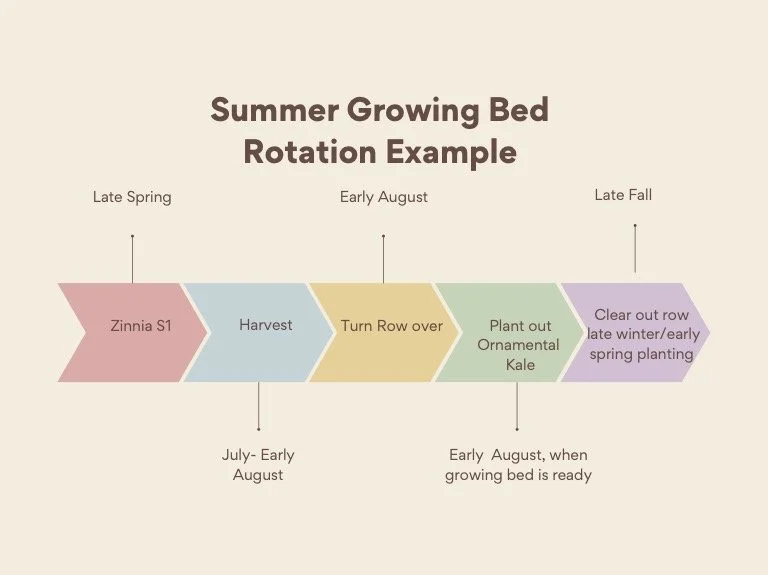
The second third of your beds is set aside for warm-season crops, giving you a jump start on summer while spring crops finish up. Planting these in late spring is best, with double tunnels ready for any unexpected frosts. Once harvested in mid-summer, these beds can transition to fall crops like ornamental kale or another fast, late-summer crop.
An example here is zinnias, which are relatively quick to mature and offer consistent blooms through July. Once other successions of zinnias are established, you can pull the earlier plants in August and replace them with ornamental kale (this year, we’ll be using insect netting). Timing is essential here: by mid-June, I aim to have all warm-loving crops planted and established. From this point, planting later-season crops is only feasible if they’re quick to grow, like single-stem sunflowers, which mature fast, work well as a focal bloom, and store well in the cooler.
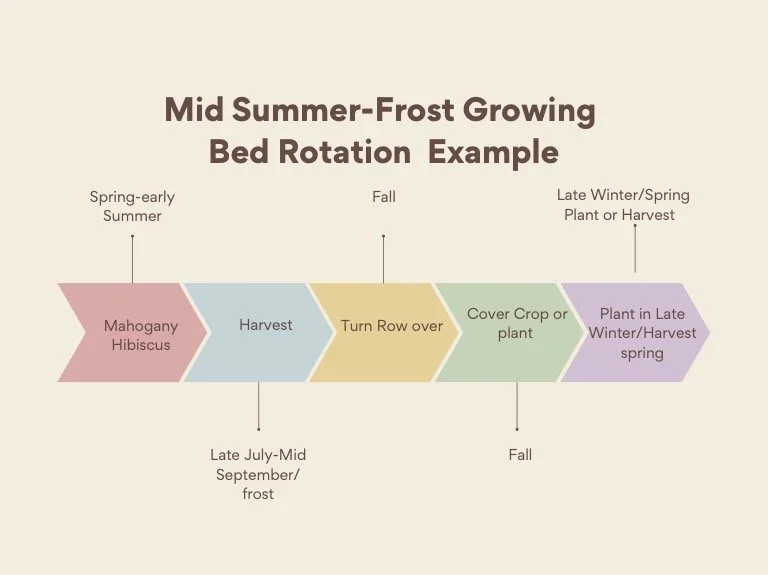
In late spring to early summer, we might plant Mahogany Splendor Hibiscus, which needs warmth and won’t be ready for harvest until August. This crop stays productive until the first frost, after which the bed remains dormant until late winter, starting the cycle again.
Utilizing the Last 1/3 of Growing Beds

The final third of your beds is your flexible space for crop rotation. Use these beds for cover cropping, tackling weed issues, or testing quick-growers and experimental crops. Even with all the planning, nature can throw curveballs. Keeping this last third adaptable allows you to respond to challenges and opportunities as they arise.
Some Food for Thought
The examples we’ve shared highlight a mix of longer-growing crops, allowing for at least two harvestable turnovers per growing bed. Our primary growing season runs from mid-April through the first killing frost, which typically falls between late September and the end of October for field-grown crops.
If your growing season is longer, you may be able to fit one or two additional crops into a bed, particularly fast-growing varieties. This flexibility depends on experimenting and keeping detailed notes to fine-tune how much production you can realistically achieve from each bed.
Healthy Crop Rotations are Essential
While planning rotations, it’s important to think about pest and disease pressure. Certain plants attract specific pests, making it risky to follow one crop with another prone to the same issues. For example:
Snapdragons and Nicotiana: Both attract caterpillars. Replacing snapdragons with Nicotiana in the same bed can invite a pest infestation.
Ranunculus and Ornamental Kale: Ranunculus is a favorite of aphids, and planting kale in the same bed afterward increases the risk of an aphid outbreak.
Scented Geraniums and Dahlias: Both are susceptible to gall, so avoid planting one in a bed previously occupied by the other.
When mapping out your rotations, prioritize breaking pest and disease cycles by varying crop types. This proactive approach will help maintain healthier plants and protect your growing beds for future harvests.

When It’s Time to Say Goodbye
Saying goodbye to a crop can be tough, especially if it’s still producing some flowers. You might find yourself hesitating, wondering if the next crop will be as productive. However, holding onto an underperforming crop often does more harm than good. Over time, you’ll get more comfortable pulling a crop out when it’s time to make way for the next round—especially when that crop starts to feel more like a freeloader than a contributor!
When to Let Go
Sometimes, crops underperform right from the start, costing you time and money without yielding marketable stems. Other times, they simply reach the end of their productive life. Here are some clear signs it’s time to move on:
Stunted Growth or Premature Blooming: The plant never reached its potential.
Disease or Pests: If pests or diseases overwhelm the crop and you’re spending more time battling them than harvesting, it’s time to cut your losses.
Seed Production or Rapid Fading: If the crop is setting seed faster than you can harvest or the blooms fade too quickly, it’s better to focus your energy elsewhere.
Excessive Maintenance: If you’re picking off caterpillars daily or battling relentless fungal issues, it’s time to say goodbye.
The Bigger Picture
While there are ways to nurse a relatively healthy plant back to productivity, if you haven’t harvested a decent number of stems over the past month, it’s time to move on. Clinging to an underperforming crop can risk spreading pests or diseases to the next planting, affecting your yields later in the season.
For instance, scabiosa can seed out faster than you can harvest, making it more practical to rip out the crop rather than waste time. And some years, despite your best efforts, certain crops just don’t thrive—it’s okay to replace them with something more productive.
Make Space for New Growth
Saying goodbye to crops can feel counterintuitive, especially when there are still a few harvestable stems. But clearing the bed and planting fresh, healthy crops is often the best decision for your farm’s productivity. Harvest what you can, store it in the cooler, and get those growing beds back into action with thriving new cultivars.
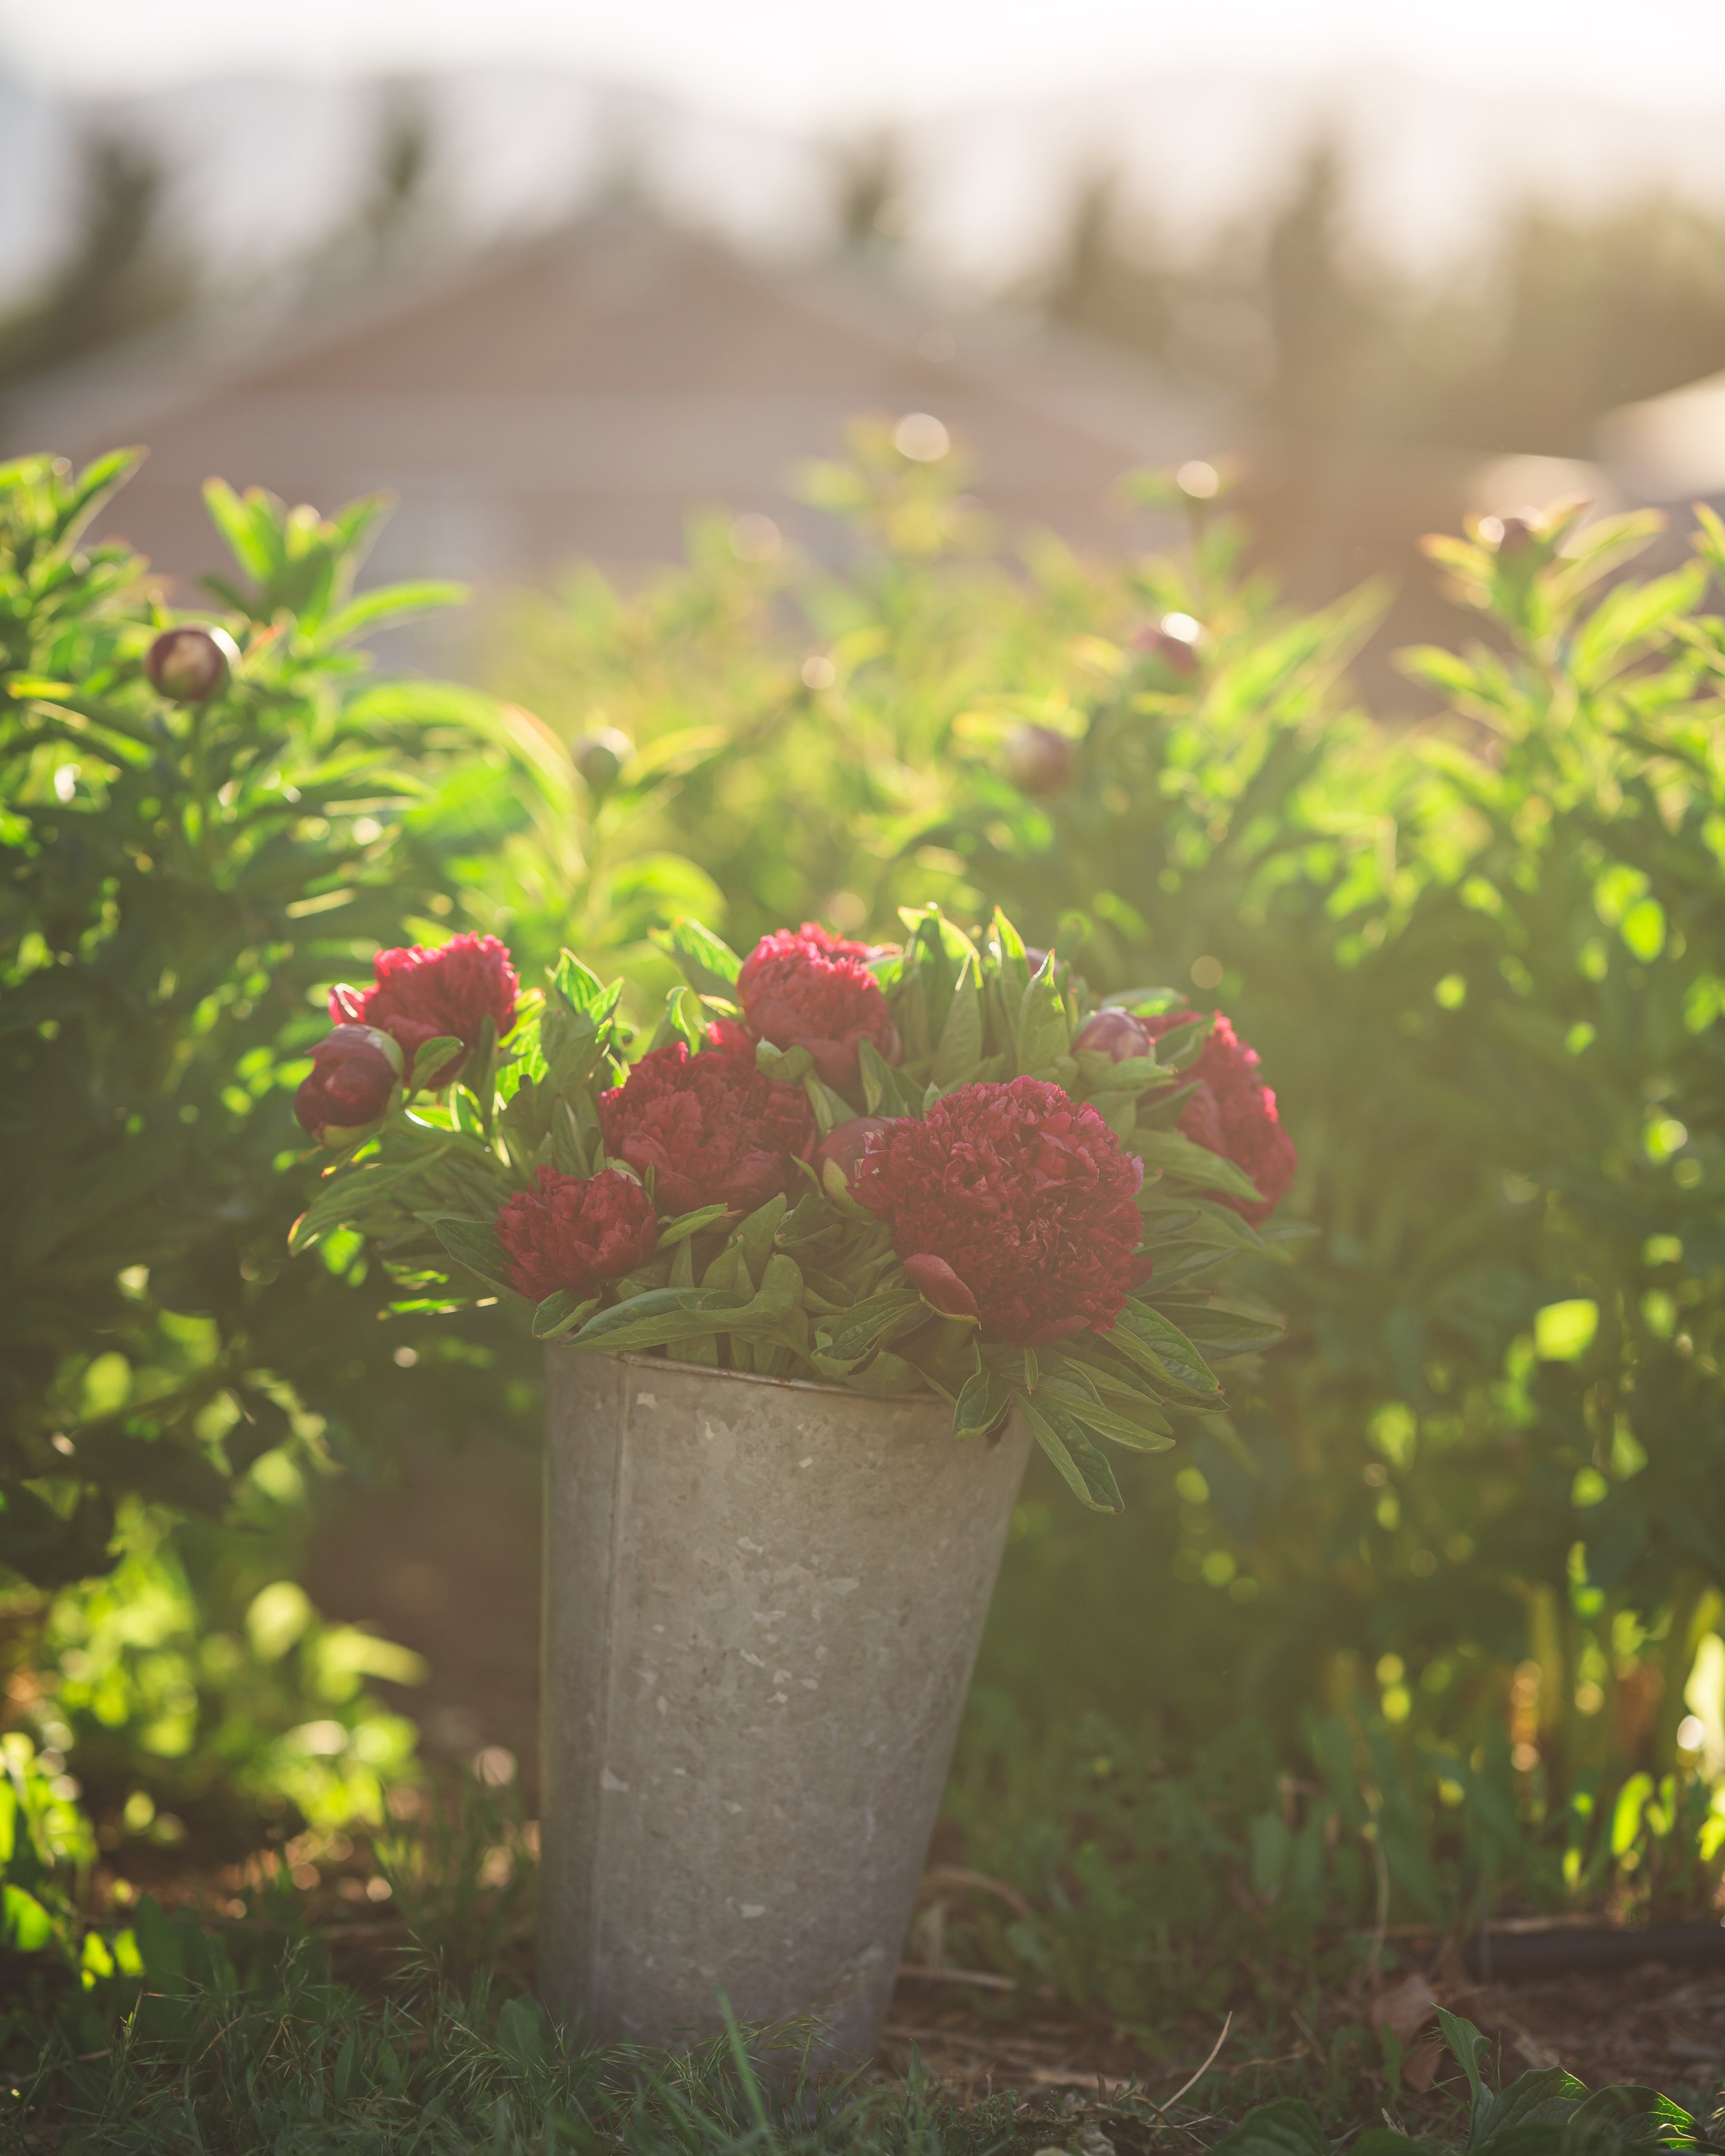
Peonies were our first perennial investment at Sierra Flower Farm. They save us every early summer with oodles of blooms for our wedding engagements and other bouquet offerings. They take a few years to mature, so invest in them early if you have the space!
Perennial Cut Flowers Are Your Friends
At Sierra Flower Farm, we’ve operated primarily with limited perennials. While this approach is doable, it’s not something I recommend unless it’s your only option. At our last property, we had a handful of perennials but not much to work with. And at our current location, the landscape was nearly nonexistent—especially after we removed all the junipers!
If you have the space and budget, I highly recommend planting perennials as soon as possible, particularly peonies. Perennials can be game-changers, especially in spring, helping to bridge potential crop gaps. They also bring a sense of predictability to your farm. Unlike many annuals, perennials often fetch higher prices and require less ongoing effort after their initial planting and maintenance.
That said, even without relying heavily on perennials, we’ve found annual crops that have been lifesavers during our growing seasons. While perennials can simplify your workflow and provide premium blooms, there are always alternatives if you’re just starting or need time to establish your fields.

When harvested at the right stage, ranunculus flowers can hold in the cooler for weeks making it a great flower for crop gaps between spring and summer!
Saving Grace Cultivars That Hold Well in Storage
Crop gaps are an inevitable part of flower farming, especially as seasons transition. Despite all the planning and effort we pour into our crops, factors like unpredictable weather, fluctuating temperatures, and wind can throw us curveballs. The joys of flower farming, right?
Over the years, we’ve come to rely on specific cultivars that can be harvested and held in the cooler for a significant time. These “saving grace” crops are invaluable for covering large orders or bridging crop gaps, especially when flirting with early fall frosts while events and orders are still on the books.
Even if you don’t have a full walk-in cooler yet, there are budget-friendly options to keep stems fresh. For example:
Convert a deep chest freezer into a cooler.
Use an old fridge or a second-hand floral cooler.
Transform a trailer into a makeshift cooler.
Starting small is perfectly fine! There’s no shame in letting your flower farm grow into affording that dream cooler. To properly store your stems, aim for a temperature range between 37–42°F, depending on the crop. If you’re looking to dive deeper into the topic, I highly recommend The Post-Harvest Handling of Cut Flowers and Greens book.
Here are some tried-and-true crops that hold beautifully in storage:
Tulips
Peonies
Ranunculus
Seeded Cress
Eucalyptus
Heirloom Mums
Sunflowers
Lisianthus
Stock
Strawflower
Statice
Gomphrena
Dusty Miller
Marigolds
Scented Geraniums
Yarrow
Iceland Poppies
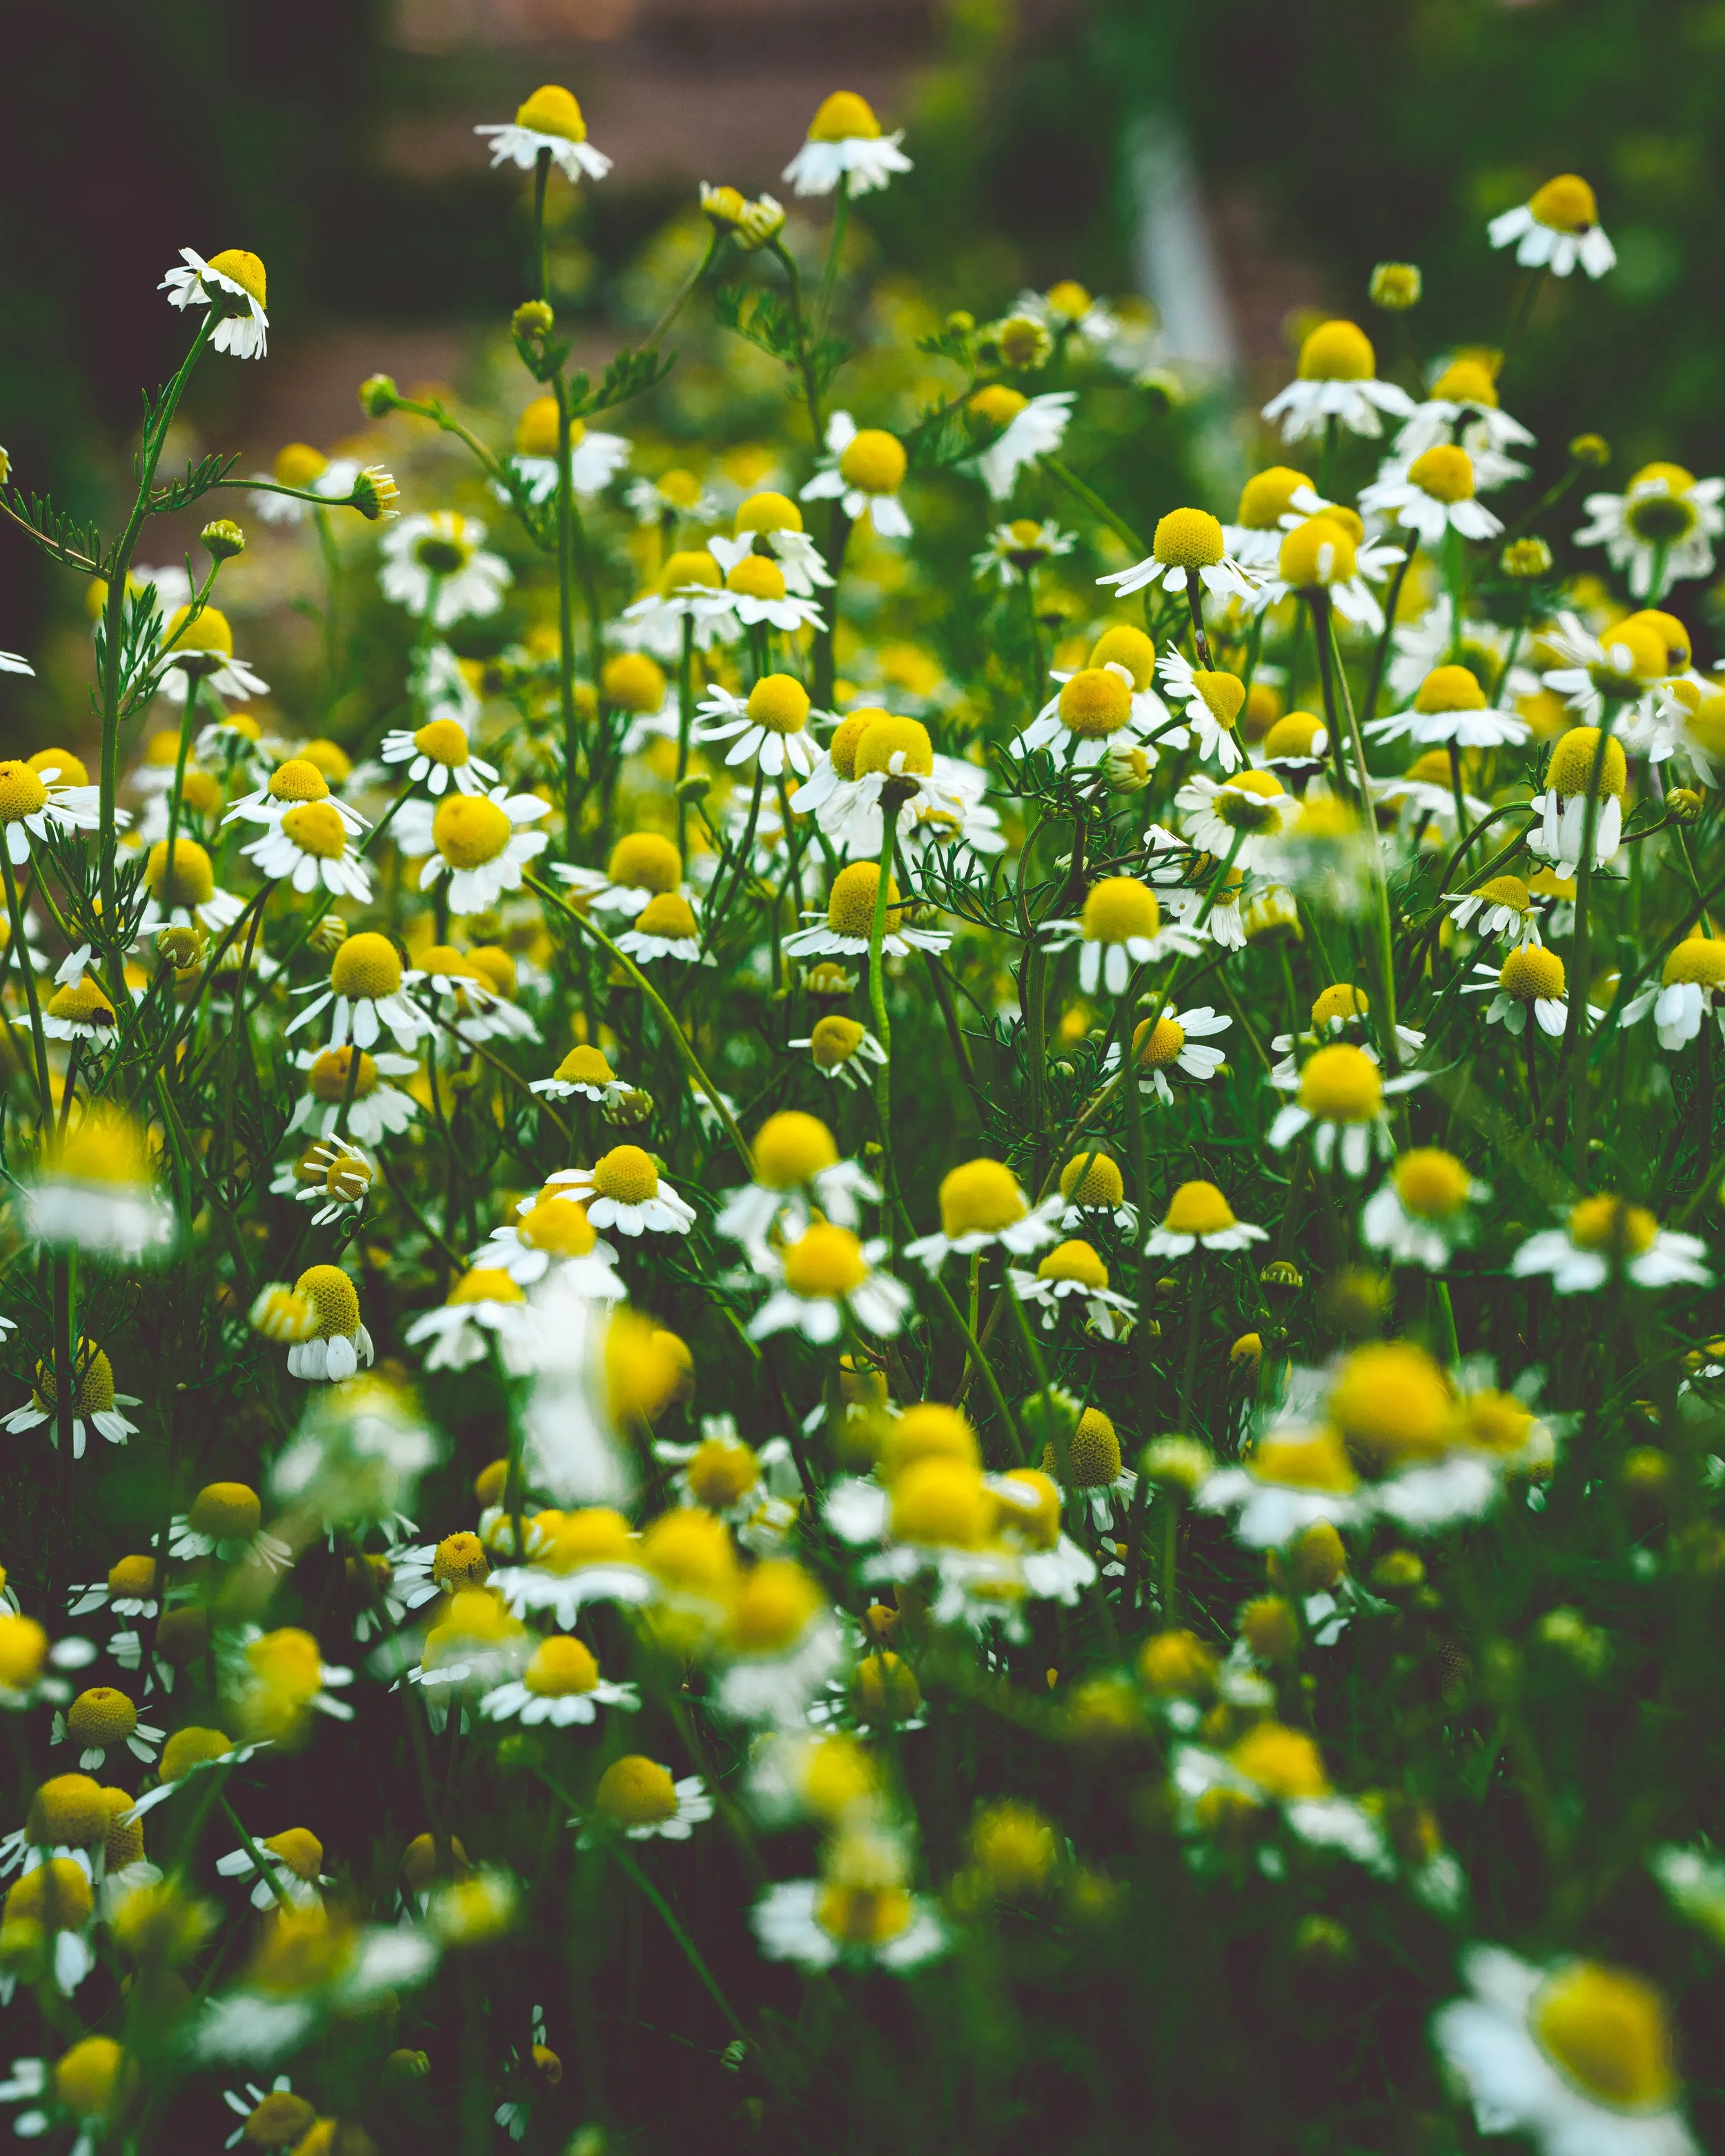
Each May, we're grateful for our German Chamomile, adding a delicate honey fragrance and soft beauty to our floral designs. And come winter, we’re thankful all over again with homegrown dried chamomile for a steaming mug of tea—like a cozy hug from the growing season!
Saving Grace Cultivars with a Quick Turnaround
There have been many seasons when we’ve faced crop failures or needed a fast-growing variety to fill gaps. These “quick-turnaround” cultivars have been our saving grace. While some aren’t necessarily my personal favorites, they are reliable options to have on hand for emergencies.
Here are some fast-growing examples to consider:
Single-stem sunflower varieties (or branching types sown as singles; plantable from late spring through frost)
German Chamomile (great for spring and fall)
Calendula (sow mid-spring, early summer, or for fall harvest)
Phlox (works from mid-spring through frost)
Bouquet Dill (I can’t stand the smell, but it’s quick and fills bouquets!)
Saponaria (especially in late spring)
Bachelor Buttons (from spring through early summer, and again for fall harvest)
Basil (harvestable from summer to kill frost)
Garden Baby’s Breath
Silene
Do you have cultivars that happily self-sow for you? Let them do the work! If you can spare the space, allow those volunteers to guide your sowing timeline. Sometimes, they know the right timing better than we do. Around here, it’s dead January, and the German Chamomile is already popping up as if to say, “Hey, it’s time!”

Bringing It All Together
Woo-hoo! You’ve made it to the end of my (slightly lengthy) ramblings, and I’m so glad you stuck with me!
My hope is that you now have a clearer understanding of crop rotations, seasonal flow, and how to manage different stages, cultivars, and successions. With these tools, you’re well on your way to embracing your role as the composer of your cut flower field.
If crop planning has felt overwhelming, I hope this serves as the missing piece to complete your puzzle. You’ve got this—and I can’t wait to see the bounty of blooms your growing field produces all season long.
Ready to take your crop planning to the next level? Subscribe to our newsletter for actionable tips, insights, and resources tailored to flower farmers!

We are looking forward to sharing more blooms with you soon.
Jessica & Graham