
The Nitty-Gritty Guide to Soil Blocking
During my first year of flower farming, I was on the lookout for methods that could help me reach four essential goals:
Grow healthy, high-quality flowers
Stick to a tight budget
Maximize space
Support the earth’s health, not deplete it
Soil blocking quickly emerged as a solution that could help me meet all four. But what exactly is soil blocking?
Simply put, soil blocking is a way of starting seeds in compacted blocks of soil instead of plastic propagation trays. Many trays can be flimsy, breaking down over time, and sturdier options often come with a high price tag—up to $16 per tray! For a farmer starting thousands of seedlings, that cost adds up fast. Soil blocks, however, are budget-friendly, reduce plastic use, and are an effective way to start seeds.
At Sierra Flower Farm, we now use a combination of soil blocks and propagation trays. Trays are convenient for cold days or when I need flexibility. Still, soil blocking remains a go-to method for many flower varieties, thanks to its unique benefits. Whether you’re a small-scale grower or just looking to try something new, I consider soil blocking an essential skill to have in your toolkit.
Soil blocking was popularized in the U.S. by Eliot Coleman, a pioneer in organic gardening. His books and videos are a fantastic resource for anyone interested in sustainable growing techniques.
Using soil blocks might sound counterintuitive—how can young roots grow in a compacted block of soil? But that’s where the magic of the soil-blocking mix comes in. Unlike standard potting soil, a soil-blocking mix contains a generous amount of perlite, which ensures good drainage and allows oxygen to reach the roots. This setup keeps roots healthy and encourages them to grow and thrive in their soil blocks!
Note: This post contains affiliate links. If you make a purchase through these links, I may earn a small commission at no additional cost to you. Thank you for supporting our farm!

Benefits of Soil Blocking
Cost-Effective: With soil blocks, you skip the constant need to buy plastic seed trays. Although soil blockers have an upfront cost, they pay for themselves over time, especially if you start thousands of seedlings each season. A couple of sturdy cafeteria trays, and you’re set!
Reduces Transplant Shock: Soil blocks help prevent root-binding by air pruning, so roots don’t tangle or stress before transplanting. This means less transplant shock and steady, healthy growth—no sulking seedlings here!
Space-Saving: Soil blockers take up minimal storage space, and soil blocks themselves fit neatly on greenhouse shelves. Plus, they’re heavy enough to stay put in windy areas, which means no chasing scattered trays. With fewer trays to clean and sterilize, your setup stays efficient.
Eco-Friendly: Soil blocking cuts down on plastic use, making it a greener choice. Instead of disposable seed trays that warp or crack, you can use durable options like biodegradable cafeteria trays or old cookie sheets.
Fun for All Ages: Making soil blocks is a bit like making mud pies—something your inner child (and your kids) can enjoy! It’s a hands-on, playful part of the growing process.

What You Need to Soil Block
Soil blockers in your desired size
Soil block mix purchased or DIY (recipe later in this post)
Your choice of trays (such as cafeteria trays, wooden crates or Bootstrap Farmer’s mesh and flood trays)
Dome lid (optional, for maintaining humidity, especially useful in dry climates)
Purchasing Soil Blockers
The first thing you’ll need is an investment in some soil blockers. I highly recommend Bootstrap Farmer’s soil blockers, which come in various sizes. The ¾” micro soil blocker and the 2” soil blocker are the most used sizes for our flower farm. Though I tried larger sizes, the initial two cover our needs and are the most cost-effective for the amount of soil required.
If you’re purchasing only one soil blocker, go with the micro 3/4” size. Soil blocking can be more time-intensive than using propagation trays, so using an efficient seed dropper kit compatible with the micro soil blockers is a great time-saver!
DIY Soil Block Recipe
Once you have your soil blockers, it’s time to prepare the soil mix. You can purchase pre-made mixes, but sourcing locally or making your own can save on costs and provide the freshest medium. Be cautious about using regular potting soil, as it won’t hold together well as a soil block. Adding compost and perlite improves structure, but I still suggest a specific soil block mix for the best results.
Here’s our tried-and-true recipe (yields a large batch!):
3 (five-gallon) buckets of peat moss or coconut coir – Coconut coir, though pricier, is often considered more sustainable and resists algae growth when overwatered. Monthly flushing with yucca can help manage any salt buildup that coir may retain. Peat moss, on the other hand, is generally more affordable and naturally acidic, while coir offers a neutral pH. Choose the substrate that aligns best with your needs and values, whether that’s coir, peat moss, or another alternative entirely.
2 (five-gallon) buckets of perlite – Essential for drainage and root space, perlite keeps the soil from compacting. Bonus: kids love smashing it like popcorn!
2 (five-gallon) buckets of compost – Vital for plant nutrients, compost should be fully cooked to avoid introducing weed seeds or un-composted manure. If possible, make your own or source high-quality compost.
1 (five-gallon) bucket of garden soil – This helps seedlings adapt to their future outdoor environment. If your soil is clay-heavy, consider replacing it with more compost for easier root development.
Optional: Worm castings – These add extra organic matter and beneficial microbes, promoting healthier and more resilient seedlings.
1 cup each of blood meal, bone meal, and wood ash – These provide essential nutrients and are commonly included in most soil blocking recipes, though some growers prefer to skip fertilizers. Since seeds hold a lot of initial energy and compost provides added nutrients, fertilizers may not be necessary for early growth.
Pulling Soil Block Ingredients Together
We combine all the ingredients in a wheelbarrow and mix thoroughly. Then, we add lukewarm water at a ratio of one part water to every three parts soil mix, adjusting as needed. Why warm water? It activates the nutrients, making them more readily available for seedlings. Plus, starting seeds in warmer soil gives them a head start—cold soil takes longer to warm, which can delay germination.
The soil mix for soil blocking needs to be wetter than standard seed-starting mixes. Aim for a consistency that’s wetter than a damp sponge but not soggy. Goldilocks rules apply: too wet, and the blocks won’t hold; too dry, and they’ll crumble.
One fun test we use to check the mix is tossing a handful at the shed wall (a family favorite activity!). If it runs down, it’s too wet; if it doesn’t stick, it’s too dry; and if it stays put, you’ve got it just right. If flinging mud isn’t your style, try forming blocks directly, adjusting the mix as you go. If it’s too wet, add more mix; if it’s too dry, add a bit more water.
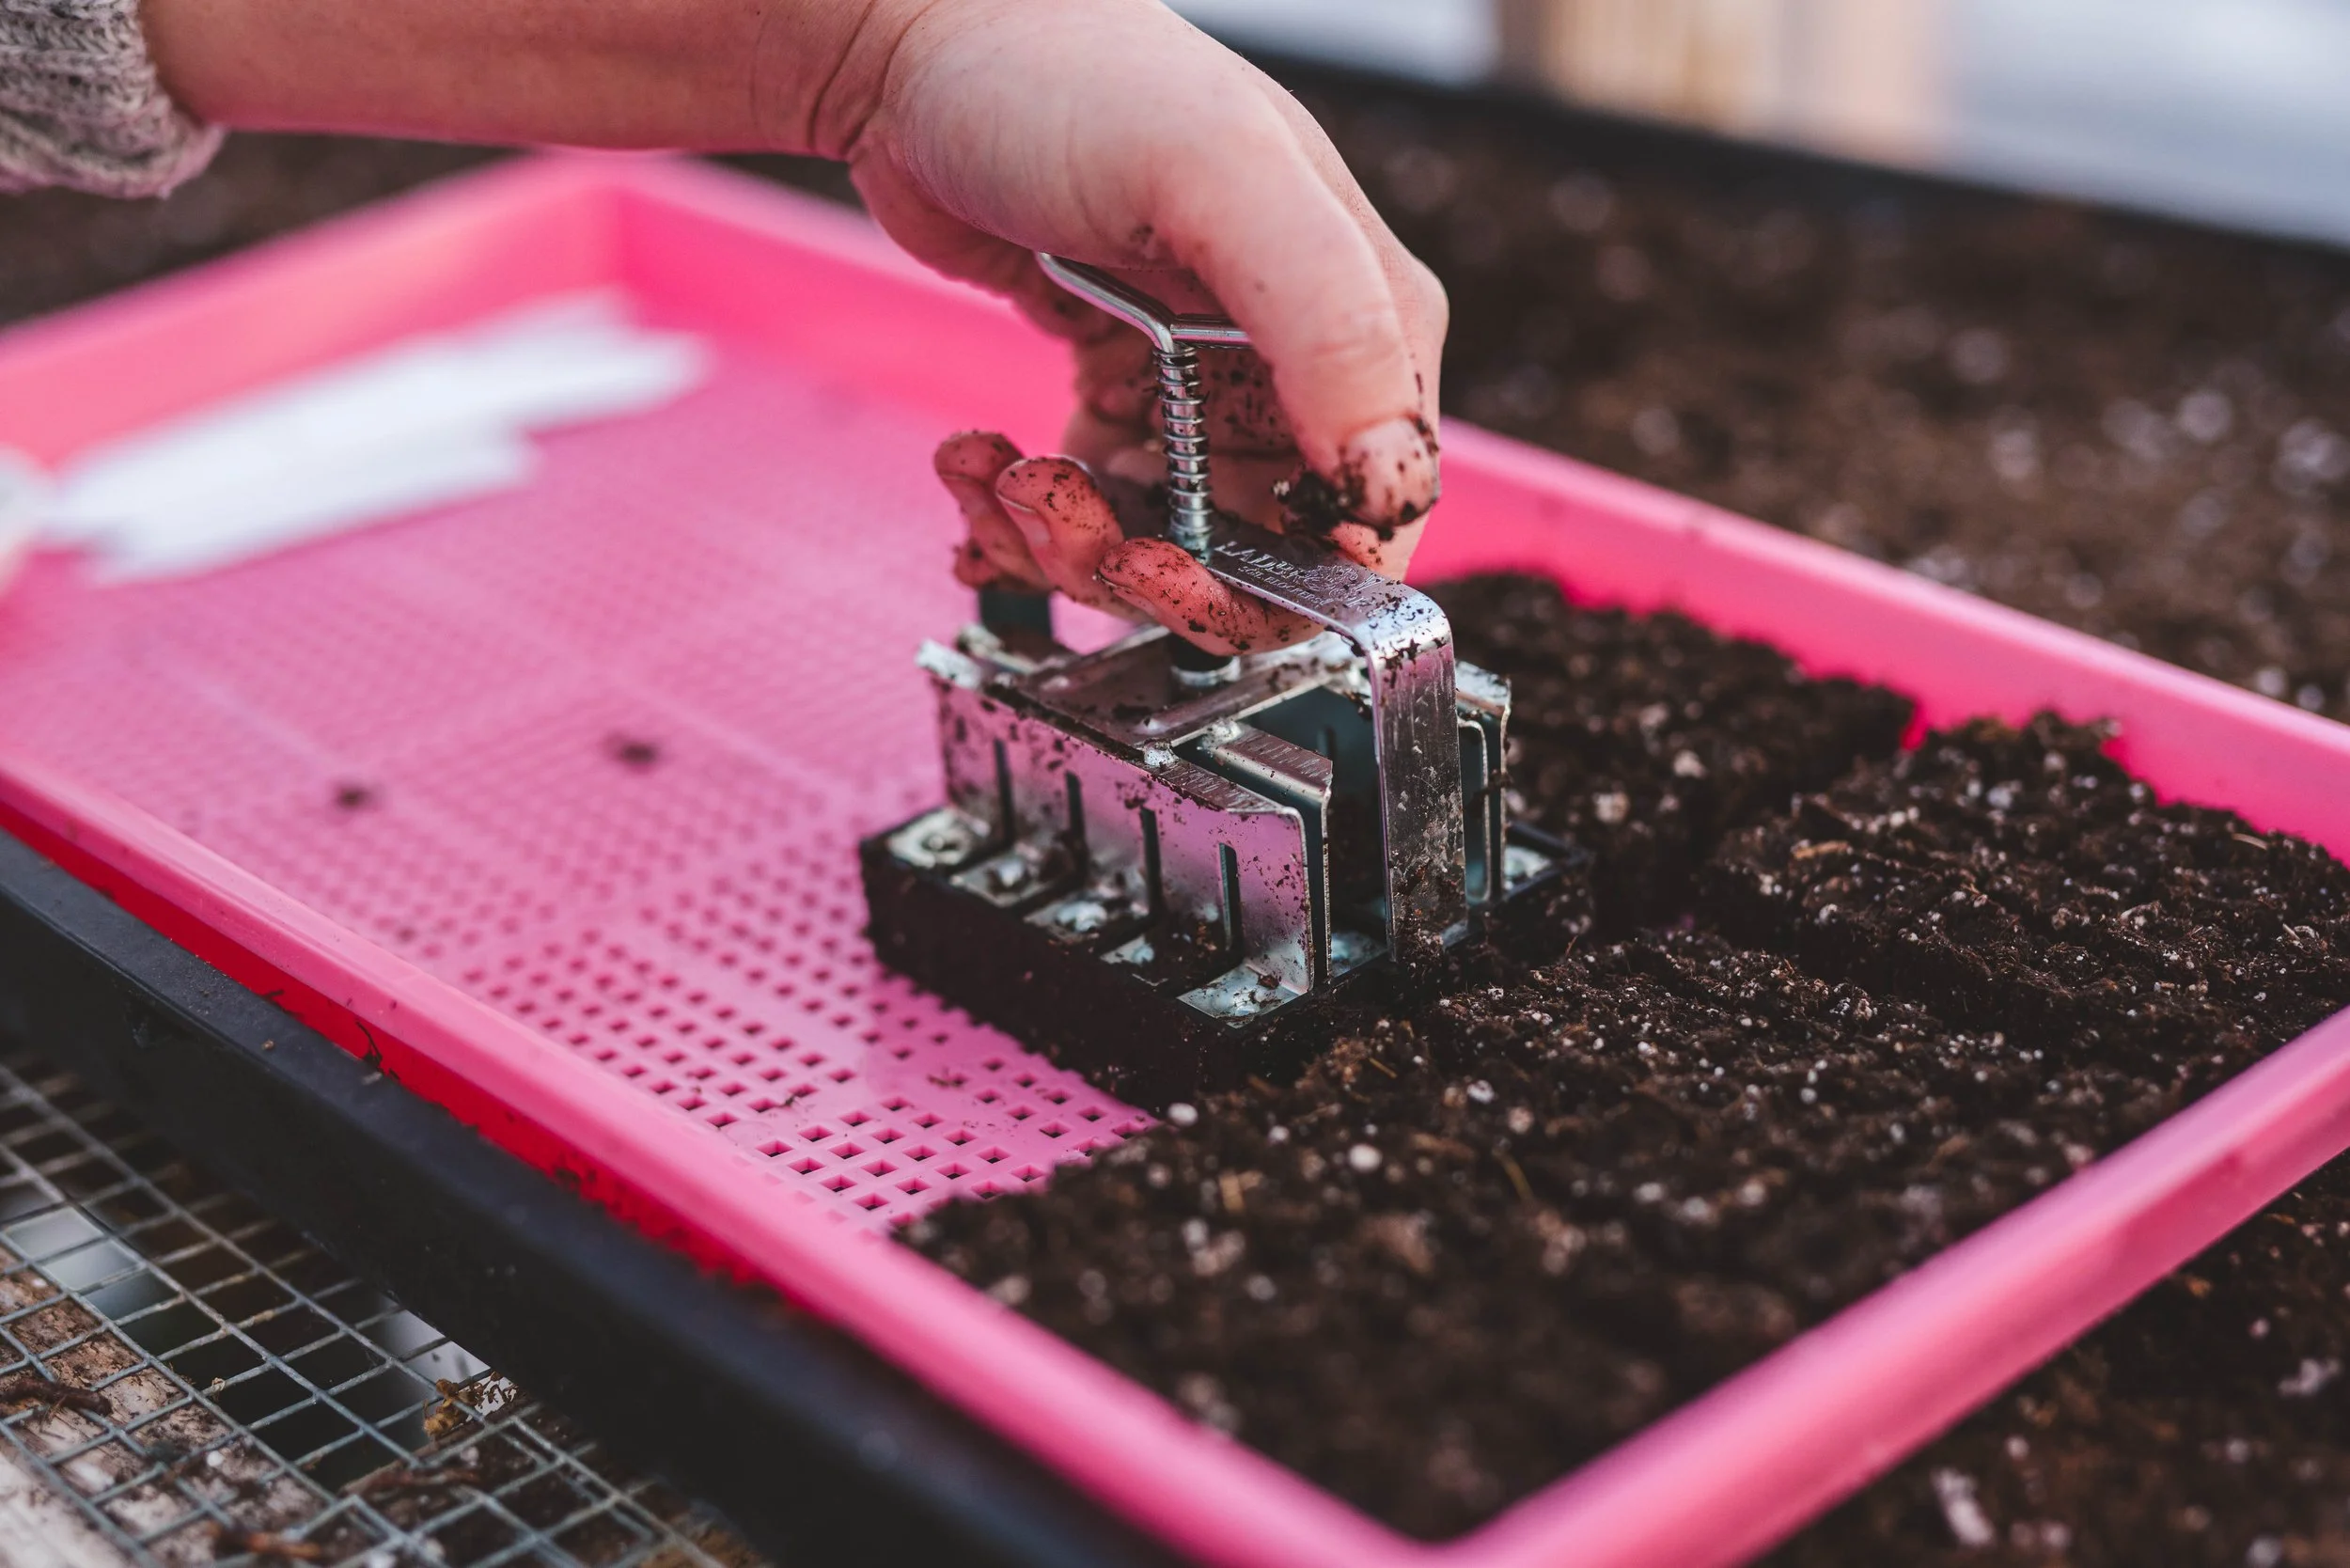
Here I am using the mini-soil blocker on a Bootstrap Farmer mesh shallow tray that is great when paired with a shallow flood tray beneath for easy bottom watering. Each tray holds about 240 soil blocks per tray.
Making the Soil Blocks
Once your mix is ready, it’s time to create the blocks. For the best setup, use a high work surface to save your back. Make a pile of soil mix about 1.5 inches deeper than the height of the soil blocker for even compression. Press the soil blocker down firmly, twisting slightly to compact the mix; you should see water seeping at the top, a sign it’s packed well.
After each batch, rinse the soil blocker in warm water to keep it functioning smoothly. Place the soil blocks in trays, releasing them with a gentle press. It takes practice, but once you get the hang of it, it’s straightforward. While we find the 2” soil blocker makes great blocks, the ¾” micro soil blocker is our go-to for most flower farming needs.
If using the micro soil blocker, you may need to press soil into each cell individually for complete blocks—tedious, but it’s worth the perfect results!


Seed Sowing in Soil Blocks
Once your soil blocks are ready, it’s time to start sowing seeds. The process isn’t too different from sowing in propagation trays, though one game-changer for us has been using a drop seeder specifically designed for soil blocks, which is especially helpful when sowing tiny seeds.
The ¾” blocks work well for most seeds, while the 2” blocks are ideal for sweet peas or for bumping up seedlings from the ¾” blocks. Instead of pressing seeds directly into the blocks, which can break them, try sprinkling a light layer of soil mix or vermiculite on top.
Watering Tips: Bottom-water to keep the blocks from crumbling, but avoid letting them get too soggy. When seedlings are more established, overhead watering can be done carefully. Soil blocks retain moisture well, but they can be tricky to rehydrate if allowed to dry out, so keep an eye on them, especially in the early germination stage.
A light misting helps during germination, while bottom-watering works best on warmer days. Adjust watering as needed based on the temperature and light conditions, using a heating mat or other preferred system if desired. For a more detailed guide, see our blog post, Nitty Gritty: Seed Starting for the Flower Farmer.
Once seedlings are robust, either bump them up to the next-size soil block or harden them off and plant directly. Soil blocks nest neatly into one another like matryoshka dolls, making transplanting easy. Even the ¾” blocks, though small, are sturdy enough for planting out—just keep them well-watered in those first few days.
Troubleshooting Your Soil Block Germination
If you encounter issues with your soil blocks, here are some quick solutions:
Excess algae growth: Cut back on watering and increase airflow.
Crispy seedlings: This usually indicates underwatering. Increase watering or, if they’re too far gone, start fresh with new seeds.

I’m using the mini drop seeder to sow pelleted foxglove seeds—such a handy tool for precision and efficiency!
Some of Our Favorite Flower Varieties for Soil Blocking
It’s been a few seasons since I made my first soil block, and while I now use a mix of trays and soil blocks, certain varieties are still best suited for soil blocking. For plants that don’t like their roots disturbed or ideally need direct-sowing (when that isn’t practical), soil blocks are a great alternative. Cold-hardy annuals, in particular, seem to thrive in soil blocks.
Here are some varieties I prefer to start in soil blocks if direct-sowing isn’t possible:
Bupleurum
Bachelor buttons
Celosia
Cress
Saponaria
Larkspur
Ammi/Dara
Nigella
Chamomile
Orach
Ornamental Grasses
Bells of Ireland
Foxglove
I also like having my soil blockers as a backup when I run out of propagation trays. This season, with kids, wind, and a mischievous puppy, I’ve leaned on soil blocks more than usual!
So, if you’re looking for a green alternative to plastic trays or want to maximize space, soil blocking could be the perfect fit for your flower farm.

We are looking forward to sharing more blooms with you soon.
Jessica & Graham
Our Favorite Soil Blocking Supplies
After making tons of soil blocks over the years, we have found these tools invaluable in shaping the best soil blocks with amazing efficiency and results! Here are our top recommendations from our friends over at Bootstrap Farmer:
Soil Blocking Starter Kit
This kit is perfect for those new to soil blocking or anyone looking to dive into micro-soil blocks. It includes everything you need to get started and experiment before fully committing to a complete setup.
Soil Block Drop Seeder - Mini 20
After hours of seed sowing, this tool is a lifesaver. Designed specifically for micro soil blocks, the drop seeder has various plates to accommodate seeds of all shapes and sizes, making sowing fast and efficient!
3/4” Micro Blocker (20 Blocks)
The micro soil blocker is my go-to for starting seeds, especially root-sensitive or fast-growing varieties that may need bumping up. It’s a major space-saver and ideal for delicate varieties.
1020 Mesh Trays - Shallow Extra
These mesh trays transformed our soil blocking process. With room for 240 soil blocks per tray, they’re durable and convenient, solving the issues of flimsy or pieced-together trays and maximizing seed-starting space!
1020 Microgreen Trays - Shallow
Essential for pairing with mesh trays and micro soil blockers, these trays allow for easy bottom watering, preventing crumbling soil blocks while supporting healthy root development.
1020 Humidity Dome | 2.5"
I don’t always use humidity domes, as our greenhouse stays naturally humid, but they’re incredibly useful for maintaining moisture when germinating pelleted seeds in soil blocks, minimizing the need for spraying or overhead watering.
Soil Blockers - 2" Blocker (4 Blocks)
The 2” soil blocker is perfect for bumping up crops or starting larger seeds like sweet peas. These bigger blocks offer just the right amount of space for robust growth.
1020 Mesh Trays - Deep
Ideal for larger soil blocks, the deep mesh trays offer all the benefits of the shallow mesh trays but with a depth suited for the 2” soil blocks, supporting strong root growth.
1020 Seed Starting Flood Trays
Paired with deep mesh trays, these sturdy flood trays make bottom watering a breeze, especially for larger soil blocks that need consistent hydration.
Premier Pro-Mix HP
This peat-based soilless substrate works wonderfully for soil blocks, seed starting in trays, and propagating seedlings, making it a versatile choice for all stages of plant growth.
Coco Coir Brick
For those making their own soil block mix with coir, this convenient brick provides an excellent base, balancing sustainability with ease of use.