Crop planning for the flower farmer
I must admit, this is a topic that I’ve been avoiding for some time, and when you are through with my ramblings you might wish we had!
All kidding aside, this is a huge step in launching your flower farming journey. We’ve dreamed, goal set, now it’s time to really get in the weeds with planning (pun totally intended).
Crop planning is a beast of a topic that could easily stretch over several blog posts for many weeks, with all the little nuances and ways you can tackle crop planning. However, we decided to throw it all in one huge post! Unfortunately, given the time of year we don’t have several weeks to go over this topic while also getting you ready to start seed sowing for your upcoming season.
Now, with all my warnings aside, lets buckle-up and hold on because this is going to be a wild ride! Truly, it will be worth it, I promise you!
Pro-tip: Since this is such a big topic, I know it definitely wiped our brains out just writing and filming it (yes… filming too!), we recommend tackling this post in parts. If you begin to get confused or frustrated at any part during this process: give yourself a much deserved break! Take a walk, stretch, stare at a wall… whatever you need to do to get back to a mentally good place. Give yourself breaks, not only while going through this post but also while you are doing your own crop planning. Crop planning used to take me weeks, the good news is now that we’ve done the upfront work it isn’t as time consuming anymore.
I think every grower has their own approach that works for them when it comes to crop planning. Between different growing climates, microclimates, product offerings, market demands and so much more: there are many ways to tackle crop planning! There is no wrong or right approach, just what works for your flower farming business and your brain! We have tried many different approaches to crop planning over the years. Ultimately, scrapped those other approaches and rebuilt our crop planning method and we are finally happy with it. To pull this blog together, to pull the years of experiences into a form that is applicable, useful, helpful, comprehensible for you guys: has been a challenge. A good challenge but a challenge.
We are going to do our best to accomplish all those things!
Before diving in, I want you to understand: we are not going to hand you a copy of our crop planning schedule. This might seem unfair but in reality, us handing our crop plan over to you would be even more unfair. There are too many variables and our crop plan is custom to our business. What we are going to do is break down everything, give your examples and calculations to get you to started on custom creating your own crop plan! Worksheets are also available to our Flower Farming Newsletter Subscribers . You should have gotten the password to access the downloads in the latest email or when you sign up today you will now get it in the welcome email.
Crop planning is where you are officially showing up and start putting the time into your flower farming business. This is also the process where you may find yourself not knowing where to start, how to execute or simply get overwhelmed. It is the beginning of learning about the the different cultivars you are looking to grow and sell for the upcoming season. The good news is: with putting in the upfront time into this, the process will get much quicker and easier the subsequent years!
Much like a business plan is the heart of any small business, the crop plan for the grower is the heart of your flower farming business. Sure, you can have pretty packaging and a nice website but if you ultimately don’t have the blooms to sell, you’re upstream without a paddle. The idea of not having crops or a crop gap is something that will definitely wake you up from a dead sleep in the wee hours of night. So, let’s avoid that as best we can!
Are you ready for this?!
Of course you are! Because this is going to be an invaluable piece to your flower farming business. It’s going to keep you on task and flushed with a bounty of blooms!
Let’s do this!
Before you get too far into this post be sure you have completed the checklist below. You need to have these on hand and a basic understanding of terms (and how they relate to you!) otherwise you might start getting lost and we don’t want that!

Mapping Out & Calculating Your Growing Space
Before you can start figuring out your cultivars, seed sowing schedule, successions and amounts to grow you really need to know what you have to work with!
Since mapping your growing space is easier to show and tell we made a video to help you out with just that.
When selecting your growing space there are a lot of considerations to make. For us, we had to work with what we had (which is everyone’s case unless you are one of the super lucky ones!). We are sitting on slightly under an acre with our house smack in the middle. The orientation of our rows isn’t our preference but given the layout of the property and the future infrastructure we want to build, this is how we decided we could utilize the property the best. Also, when we initially moved to the property, it was in the fall and we had to quickly get it up and running to get our crops in since we already had orders for the following season and have since just worked with what we started.
A majority of our rows are forty-five feet long by three and half feet wide with eighteen inch walkways. We really wanted to be able to pack in the crops. Now, I love our growing bed dimensions because I can’t say no to a pretty flower, Graham is more practical and says in hindsight he would have done it differently. Ugh, to be a flower farming married couple, anyways, check out the video below on mapping out your growing space!
You will need to observe your intended growing patch, measure out the amount of space you intend on utilizing, deciding on your growing bed width, length, space and don’t forget to account for your walking paths. Once you know the size of your growing beds and how many of them you can begin assigning them seasons/crops.
Since we are small scale growers, we don’t like to waste space. We calculated our row sizes and walking paths in order to maximize the amount of plants we can squeeze onto the property and boy do we squeeze them in! Even though we only have about a half acre of production, between Graham and I plus an additional employee, it was still too much to handle. For the upcoming season we are looking to hire on more help but our business is also at the point where it can afford that. Definitely think about not only how many plants you can fit in but what is also realistic for you to be able to get out of the field and sell as well.
Crop Rotation and Accounting for Succession Plantings
For a majority of our annual beds, we like to be able to turnover at least twice a year. If you are looking to have product to sell spring, summer, fall plus fall planting and are not sure how to break up your growing patch to make that happen: consider breaking your growing space into thirds or even fourths. If you want to be able to crop cover with green manure on rows throughout the season or silage tarp growing beds, you will need to account for that as well. You don’t want to fill all your rows up with ranunculus and not leave room for zinnias in the summer, get what I’m saying? There are also some great crops to have throughout the season, these guys have saved us many times, such as: strawflower, bee balm, dusty miller and statice. I hack at them all season long.
When May comes circling around here, it gets intense with planting. Designating beds for certain crops that a priority early on ensures we are getting everything we need in the ground such as dahlias. We know that by the first/second week of May our tulips and narcissi are done and that space opens up for early summer crop plantings. By early June I have at least one succession of our summer/late summer crops in the ground if not two. As the spring crops are getting pulled they are being replaced by ornamental grasses, heat loving cultivars such as zinnias and cosmos. By July our later spring crops are fading out, giving us just enough time to plant some sunflowers or our early fall crops such as ornamental cabbage. After July, the only crops we sow are single stem sunflowers until we are onto focusing for fall (or rather just surviving the season…whew).
When you are figuring out your growing beds take into account any successions you will need as well. Basically, succession planting is sowing the same cultivar (crop) multiple times spaced out over a few days or weeks (intervals) throughout the appropriate growing season. For example, one cuts such as single stem sunflowers I like to sow a fresh round every two weeks. If you are getting confused on the successions, no worries! We have a blog on that subject which we will link at the end of this post. Though, succession planting will be referenced throughout this blog, for now we need to get you mapping out what you want to grow, amounts along with the first and last successions of your chosen crops. Then you can fill in the gaps easily with succession sow dates!
Knowing when to pull up your old crops in preparation for the next succession can get tricky to understand/visualize when you haven’t actually experienced the cultivar’s life cycle. Can you get away with one succession of cosmos for three months or should they be pulled after four weeks? Unfortunately, there isn’t a standardized answer on this. It really will depend on your growing situation, space, plant health and ultimately you. There are some crops that I allow to eek by longer than they should but I also have at least one other planting of that crop. I will suggest if you are beginning to see a lot of pest pressure, disease pressure: get those plants out of your field and in the trash before they begin to spread their ick to your other crops. Single stem varieties are pretty simple, once you’ve harvested them all you can turn the growing bed over. Most single stem cultivars, I find, I can harvest over about two weeks per succession. For those repeat bloomers, there are some of the so/so producers who I do multiple plantings of, usually two to three, and leave them just fine the entire season. I like to have multiple successions of those so/so producers simply because as one round is working on re-growing, I also have another round producing harvestable stems since they are slower at producing. There are some of the more prolific bloomers, those guys I feel hit a peak and give it all they got and are burnt out around week four or five of their production. These are crops such as bachelor buttons, cosmos or zinnias. About five weeks after beginning to harvest from them, the next succession should be hitting its stride and I like to pull the tired plants out. You will need to be vigilant in watching your cultivars and taking notes on deciding when to pull them to have the growing space for subsequent crops. I recommend, like I said before breaking your growing patch into seasons and working with that space. If you end up with some extra growing room and want to get some quick crops in, you can decide that at that point. Our go to quick crop is typically single stem sunflowers.
Now, let’s change your approach to spacing crops from a hobbyist to a commercial grower. As market growers (which is what a lot of us urban/small scale flower farmers are) we need to pack in the crops to get enough out of them. Lucky for us, flowers are happy to be pretty crammed!
Our Crop Spacing Approach
Once you have your growing space and beds figured out, it’s time to calculate out how many of any given cultivar/plant you can fit in each growing bed. If you are growing with limited space, you can hodgepodge varieties in a given growing bed. We do! Not ideal but it’s what we have to work with and some varieties I don’t want an entire row (an entire row of bachelor buttons would drive me crazy!). A lot of our more light and airy elements we grow more for design, so we don’t typically grow an entire row for those either. Crops that we know we will use every stem, can be held in the cooler or are essential in our products will get a full row or multiple rows. Dahlias, lisianthus, dusty miller, eucalyptus, mums, single stem sunflowers, strawflower, snapdragons, ranunculus, anemones, sweet peas: these are crops we deem worthy of their own growing bed(s).
We personally grow very intensely. We can get away with an intense spacing for a couple reasons. First, we are in a very arid climate. This lessens the amount of disease pressure that can be typically seen, even early in a season. Not that we don’t get any disease, but that is typically at the end of our growing season when the plants are getting as tired as the farmers and darn leafhoppers decide to take over. We are also in full sun. Have you ever watched a movie filmed in Nevada or Tahoe? Do you see the intensity of that sky and sun? As long as we aren’t dealing with crazy wildfire smoke, that’s usually our skies. Planting the crops closer together creates a much needed competition amongst plants, gives each other some support on those windy days and a lovely canopy to shade their roots which as a bonus helps with some weed suppression as well. Lastly, even though we have luxury amounts of phosphorous in our soil we are lacking nitrogen, our crops don’t easily become as jungly as some other growers with different soil, which allows us to squeeze them in closer without over crowding. If you are in a climate with higher humidity, low amount of direct sunlight and more nitrogen in your soil: you may need to give your plants more elbow room so to speak, especially if you aren’t growing no-till.
The bottom line is: you will need to experiment with spacing your crops that is appropriate for your climate, soil health, unique microclimate.
One word of caution I would give: skip over landscape fabric and burning holes in them. I realize this is a super popular method and landscape fabric can absolutely be needed for your soil to combat weeds and such: I am not saying it can’t work. What I am saying is: your plant spacing will take some experimentation and you don’t want to get married to your spacing because you burnt holes in a lot of expensive landscape fabric your first year really growing on a commercial level. Also, if you aren’t familiar with the different cultivars or landscape fabric you may experience accidentally scorching your transplants. Give yourself time to figure it out and if your weeds are super out of control consider silage tarping, no-till, etc for at least one or two seasons before diving into such a huge investment.
Below are some examples of crops with our spacing:
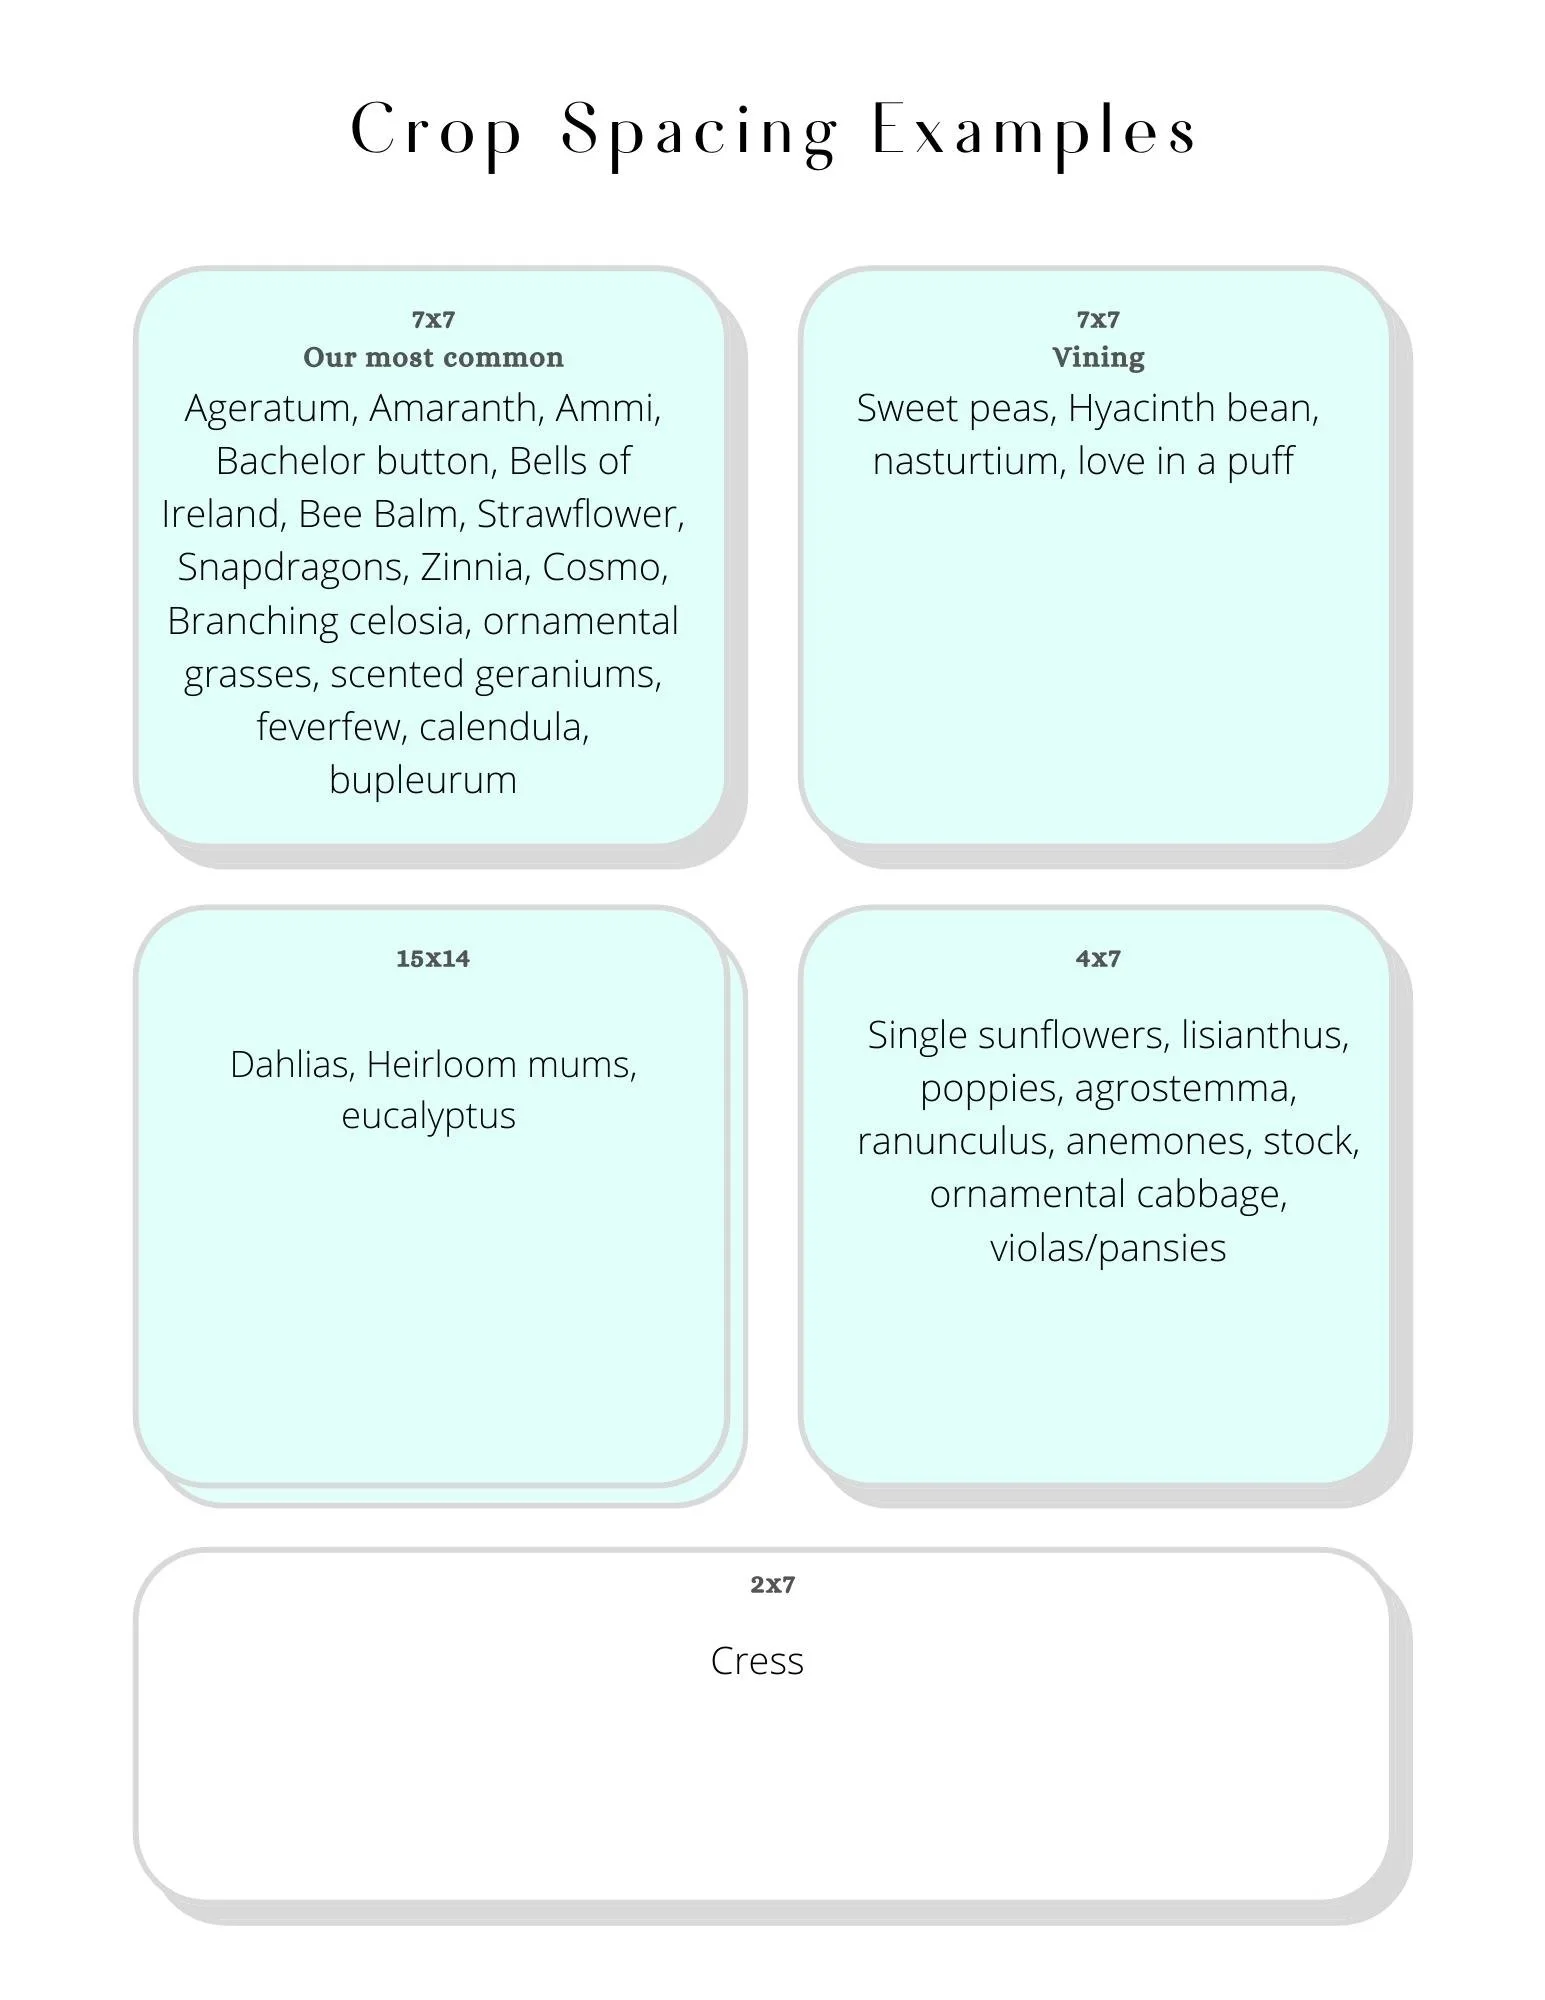
With the above spacing and our growing beds we can then calculate the amount of plants we can fit in each growing bed. We know, width wise, we can fit up to five rows of crops with seven inches in between. The seven inch spacing width does not change… ever, since we like to keep the irrigation lines consistent with spacing. Length wise, we will change up our plant spacing. Our most common spacing is seven by seven inches. We also do four by seven inches, mainly for our single stemmed varieties. For vining crops we have two rows in the center seven inches apart. Though, admittedly, when Graham isn’t looking I totally sneak in some quick growing crops such as Chinese forget me nots, making four rows of crops in the vining rows… call me a rebel.
We have more spacing for our bigger varieties such as dahlias and heirloom mums giving them fifteen inches of elbow room and planting off center to give them more space.
Using our row measurements as an example and our designated spacing I can then calculate it out:
Remember, our rows are 3.5ft wide and 45ft long.
First, convert your bed length into inches.
Then divide by plant spacing (in inches).
You now know how many plants your can fit along the length of the row.
Now you need to figure out how many rows with the width you can fit.
Convert the width of your row into inches.
Divide width inches by plant spacing.
Example:
45feet X12 = 540inches/7inches = 77.14 plants
77 plants can be planted along the length of the row.
Now, we need to figure out the width.
3.5feet x 12 = 42 inches/ 7 = 6
Now this gets a little wonky because of our irrigation lines so we can actually fit 5 rows width wise since we need to take one row away to make this work. Definitely take into account, measure and map out where your drip irrigation lines will go in your growing bed. Also, if you weren’t thinking of using drip irrigation I want you to take this time to reconsider that…
See below the amount of each plants we can get with the designated spacing in one of our standard rows:
7x7” crops: 385-386 plants
4x7”: 675 plants
7X7” vining; 154 plants
15x14”: 108 plants
2x7”: 1,350 plants
As you can see, we squeeze a ton in one row. This is what allows us to be able to to have enough for events, our subscription members, a vegetable share and some extras as well. With a majority of our rows, remember, we are also aiming to turn over at least twice during a given year as well.
If you are unsure what you should be spacing your chosen cultivars, the seed packet directions is a good start along with the Specialty Cut Flowers Book.
Keep it Simple with Week Numbers
Crop planning will get complicated really quick, especially for a first year flower farmer. The first piece of advice I’d really like to hammer home to you is: look at the calendar in terms of “week numbers” rather than “exact dates.” I will admit, my first couple seasons of flower farming I used exact dates when crop planning. What a hot mess. I didn’t even know week numbers was a thing!
Week numbers are a total thing. When placing orders with wholesalers, getting those orders in and more, they all operate in week numbers instead of exact dates. Meaning right now, as of today January 18th we are in week number three of the year. Your wholesalers are utilizing that week number rather than that it’s January 18th. I like to use this calendar when referencing the week numbers (since they do tend to shift slightly from year to year). I also recommend printing out a copy to keep on hand while doing your crop planning. Utilizing week numbers will make calculating start dates, transplant dates, succession dates and target harvest dates SO MUCH EASIER.
Throughout this post and the handouts provided, we will be using week numbers.
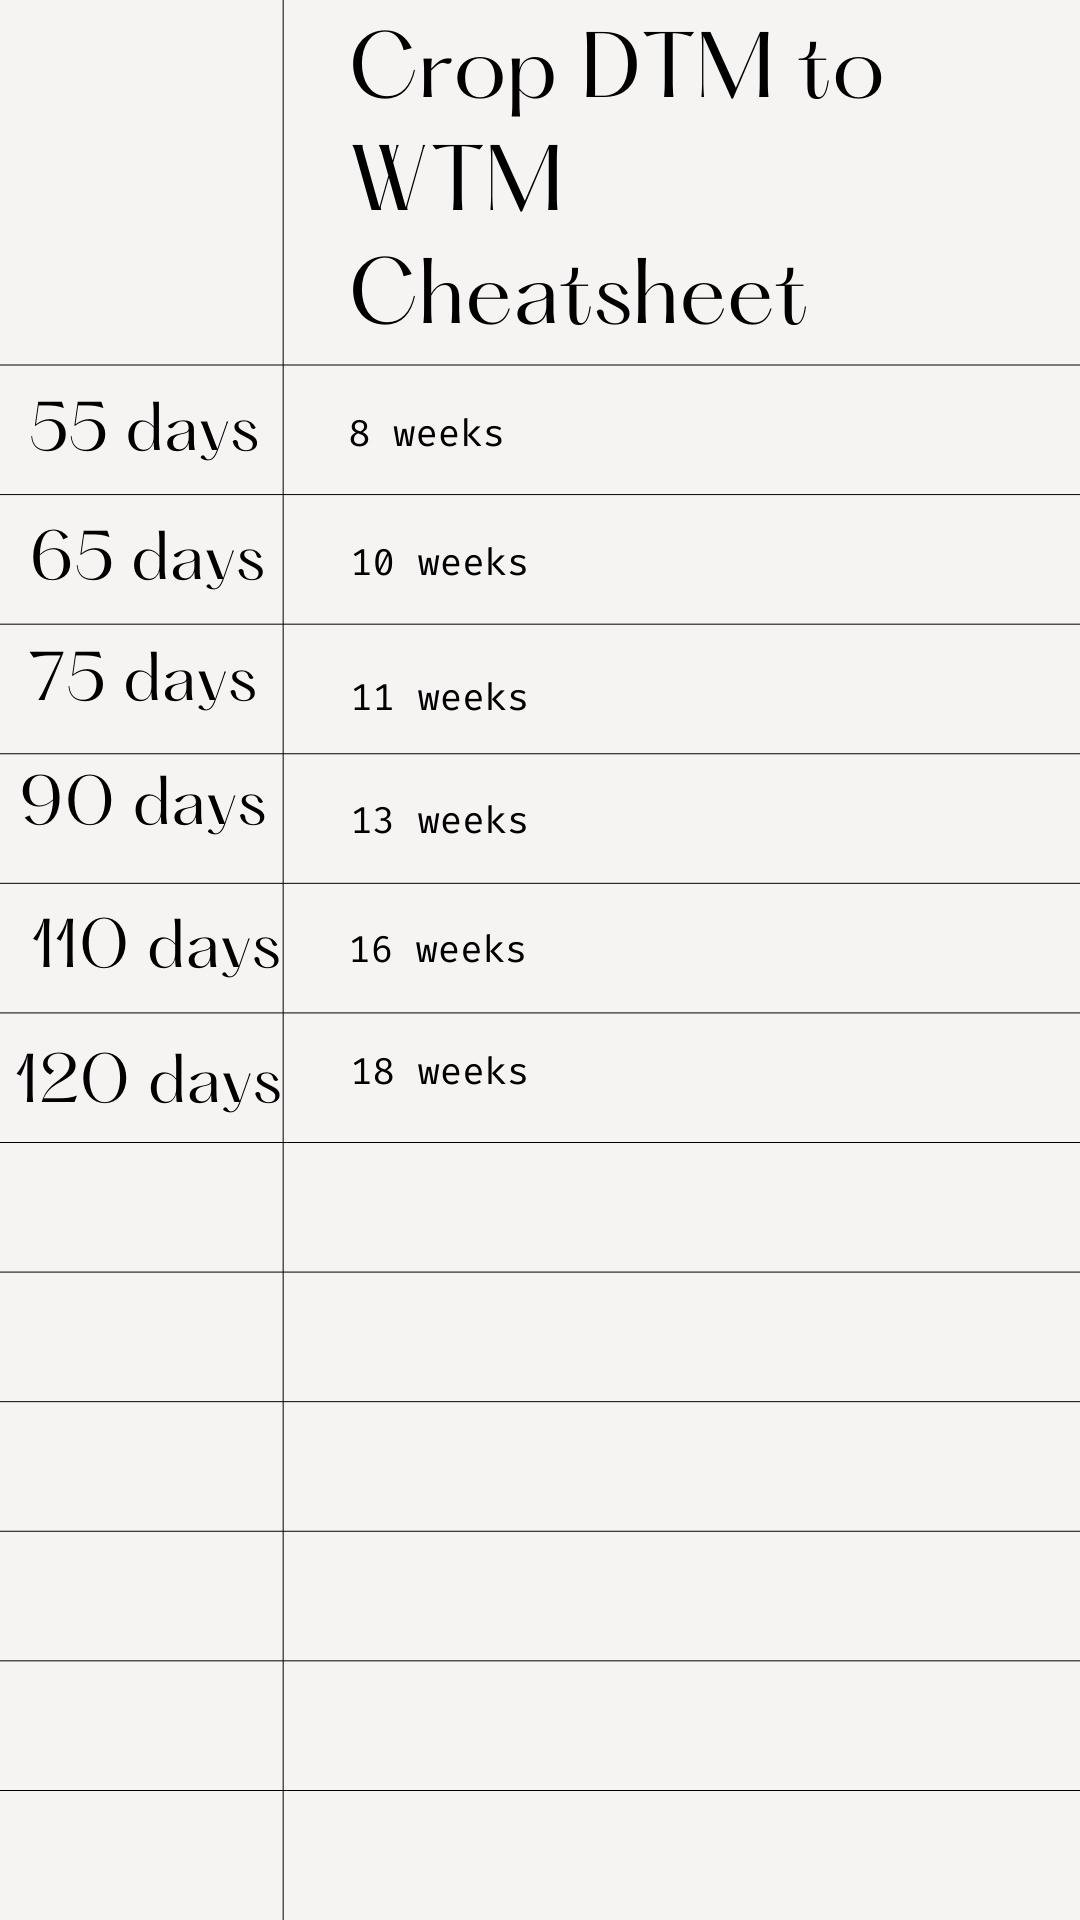
Calculating Days to Maturity (DTM) to Weeks to Maturity (WTM)
What you’ll need to calculate is DTM to WTM which is super easy:
DTM/7 = WTM
I do recommend just rounding up to the next week when calculating. I will say this throughout this post: you can always hold blooms if they bloom too soon but you can never force them to mature faster than they will given a number of variables that can affect the harvest window (some in your control, most not).
Below is a cheat sheet with the more common DTM converted into WTM. For our friends who have subscribed to our Flower Farming Newsletter, we will also have it as a downloadable printout available for you, that way you can also add to it!
Deciding on Your Cultivars
Okay, now we’re going to get to a more fun part, finally! Deciding on your cultivars!
Hopefully you followed the checklist at the beginning on this post by reading and doing the associated worksheets before getting to this point. If you haven’t, I really recommend going back and completing that checklist.
You will need to know when you want to have product for sell. Which season you are planning on selling your certain cultivars during: spring, summer, fall? Even better to begin to hone them down into months, then into week numbers. For example, ranunculus is a spring crop for us, as are tulips. Tulips I typically have ready to harvest week 15 to week 19 whereas I have ranunculus hitting its stride on a good year week 19-20. Both spring crops, different harvest windows (at least in our climate and growing conditions).
Aside from when you want to have product to sell, you will also need to decide what. There are so, so, so many pretty flowers to choose from!
You can quickly find yourself choosing a little bit of this and that, which isn’t a terrible approach but that can make crop planning and getting your products assembled more challenging. Also, it will be more of a learning curve as far as learning the various cultivars, learning how to grow them, harvest and post-harvest handling. You may also find yourself having to hodgepodge bouquets together making each one very unique. You really want to be able to have enough stems to easily assemble mixed bouquets or have enough consistent product to sell to your florist. If you are working with limited space, you will really have to be careful with the variety of cultivars you are deciding to work with. Now, personally: I went big! I tried everything, I did the hodgepodge thing and I’m here to tell you it was a lot of work but on the flip side, I quickly learned incredible amounts of a lot of cultivars. It also gave me what I thought was a “safety net” in case some crops didn’t work out. In hindsight, I should have done less varieties and focused on doing them well.
Knowing whether your product is intended to live on a “kitchen table” for a week or two versus “wedding” flowers will help you begin to better focus on which cultivars you should be growing for your upcoming season. Not saying that cultivars don’t cross over to work for both of these types of products but you may also find it not cost effective. Some cultivars you may also find take too long to establish to make them worth the space you are giving them, especially if you are not interested in selling event flowers. Example: I’m obsessed with lisianthus but I would not grow them solely for mixed bouquets. They take too much time in the propagation house, purchasing plugs can get pricey quick and they sit in a bed for a long period of time until they finally give you a max of two good cuttings. I love lisis for event work, they save me but if I wasn’t focused on event flowers, I couldn’t justify giving them growing space.
I covered this in our “Deciding on your product before crop planning” blog but I’m going to cover it again just in case.
Kitchen table products need to:
Have a good vase life
Be relatively inexpensive
Fluffy bouquet
Kitchen table products rely on repeat transactions. You need to keep your customers happy so they also sing your praises to all their friends! The mixed bouquets need to have an appearance of being fluffy. Bigger components such as sunflowers and Benary zinnias help with that, by filling space with minimal ingredients. I like to layer in ingredients that are more open and ones that are still just bud stage. Adding in everlastings really helps to give the feel of a longer vase life such as statice and strawflowers. Kitchen table products also takes educating customers: your farm fresh flowers need lots of water! I’ve had customers where their flowers don’t even make it home because they decide to leave them in a hot car while the same day, other customers have their flowers last two weeks. Educate, educate and provide accessible resources for your customers to be able to take responsibility for their flowers.
Wedding (event) flowers need to:
Be beautiful
Will have more luxurious cultivars
Can absorb the cost of the more luxurious cultivars
Only need to last the event date
More delicate ingredients add a nice touch and whimsyness
High quality
Specific colors
Wedding or event flowers do not necessarily rely on repeat customers but you need to make that wedding couple happy in order to have good reviews, avoid breaching your contract, etc. Even if you are selling event flowers wholesale to a florist, they really should be your top notch blooms coming out of your field. Event florals can be really profitable but their higher price tag truly comes with those higher expectations. It’s like a constant cycle that feeds off each other. We demand a high price for event florals because of those expectations. Even selling bulk buckets to wedding couples, they are going to expect fresh, fluffy and beautiful blooms to DIY their wedding with. No matter the event engagement, especially weddings, price your flowers and designs accordingly. There is more stress and customization that comes along with events.
Event florals can be more open staged and certain varieties should be open at their peak. Once that flower is at it’s peak we know that is when it is going to fade quickly. Event florals only need to last their event, though, our couples will text us a week plus out saying how beautiful their flowers are still but you are only promising for that event date.
Though you will get some wedding couples who are happy with a cosmo and sunflower bouquet, a majority of wedding couples are expecting those high end flowers that are not typically seen in everyday bouquets. They want double tulips, fluffy peonies, garden roses, lisianthus, anemones, ranunculus, dahlias and smaller details such as decadent sweet peas. The cultivars desired for events usually come with a heftier initial investment than crops you can easily grow for those kitchen table products. Don’t get me wrong, market customers would absolutely swoon over having peonies in their mixed bouquets but that may or may not be cost effective for you to provide them in that product. This is also when looking at specific varieties of cultivars you decide to have in the kitchen table products versus weddings help as well. For example, I’ll put a Sarah Benhardt peony in a mixed bouquet, as long as I have some to spare outside my weddings, but you won’t see an Etched Salmon peony in a mixed bouquet since they are a more expensive variety. I will tuck some Elegance ranunculus in a mixed bouquet but you won’t see pon pon or cloni, since they are more expensive varieties that I choose to grow specifically for our wedding clients. The weddings make it so I can invest in those more expensive varieties, the kitchen table products don’t justify or necessarily need those specialty varieties.
Below is an example of what a mixed bouquet for our subscription members would have and look like versus a bridal bouquet for week number 27, which lands around the first week of July. This is just an example, not a real life recipe. Early July is another one of those transitional times out in our field as the last of the spring blooms are done and we’re waiting for the warm loving crops to really kick in. When it comes to mixed bouquets, we are just looking at what we have volume wise to be able to repeat that week’s recipe over and over, fifty times, for our subscription members, assembly style. Sunflowers are usually our tried and true focal flowers, especially in July. For the mixed bouquet, specific varieties and colors are not that important to us. On the other hand, for wedding flowers we need to stick to specific color palettes so they do become important (which we are about to get into more next). Typically our weddings get the first handful of flowers, such as dahlias, as they are coming on and the last of our stored flowers such as peonies. For mixed bouquets we also want to fill it up without having to use tons of stems, therefore we try to use bigger ingredients and save the more wispy and delicate varieties for event work. We also don’t shy away from using a variety of ingredients and more of them in our bridal bouquets versus a mixed bouquet but our bridal bouquet is also literally ten times of the cost of our mixed bouquet.

Color Palette in Kitchen table versus Wedding Products
Another nice aspect of kitchen table products is color palette isn’t as big of a thing. In fact, a majority of customers love the bright and bold colors of the mixed bouquets, at least in our experience. This lessens the pressure for you as the grower and makes your crop planning even less complicated. If you are unconcerned with specific colors you can also save some money by investing more in bulk on the cultivars you want to grow and opt for the mixed colors.
Now, if you are wanting to sell event flowers, color palettes need to be in your wheelhouse. Especially if you are looking at taking on the role of being the farmer-florist, color palettes is what you should mainly be focusing on. You should never promise an exact variety but you can typically work with the color palettes, provided they give you enough time.
With event florals, you are also typically looking at certain color palettes and seasons that correlate. I have yet to have a wedding couple ask for bold red for their spring wedding but I will begin to get requests for reds in fall weddings. You will need to think on what colors to grow for events. I’m here to tell you, the Patone color of the year very rarely dictates the color palette requests you will get with brides (especially since you will most likely be crop planning for your weddings way before they even release their “color of the year”). I’d recommend not paying a huge amount of attention to the “color of the year.” Definitely don’t switch up your entire crop plan to focus on it. Instead, focus on some basic wedding colors. At this point, most of our weddings are dictating the colors we are growing for the year. We have also introduced colors we love to work with to our wedding couples through our social media outlets and website that they hadn't thought of before. Definitely highlight what you like to create but also be willing to fulfill the desired color palette of your client(s).
Below are some of the more popular colors to grow throughout the season, in case you haven’t gotten requests for colors yet but want to grow for events.
Basic wedding colors to grow:
Lots of white (when in doubt, grow white!)
Blush
Salmon/Peach
Ivory
Foliage
Burgundy
Violet
Blues
Now, this is just a basic list of colors. If you are going to be taking on larger weddings, more specific color palettes will be requested. Having a nice mix of warm and cool tones is a good idea to grow for events and lots of white. With foliage, I also think of them as warm or cool toned. For example dusty miller is cool toned and attar rose scented geranium is warmer toned.
Even though there are some couples who love to go bright and colorful, you will see a lot of softer tones or dark and moody, typically. Another “color” to think about growing are “bridge colors” meaning, varieties that have subtle mix of colors that can act as a “bridge” to bring two distinct colors in cohesion. For example, let’s say you are doing a summer wedding with blush and yellow. Having a dahlia variety such as Sweet Nathalie or a cosmo variety such as Apricot Lemonade can bring those two colors together nicely. If you want to be a wedding farmer-florist, bridge colors will be your best friend. You are going to have to get comfortable in looking at crops in terms of colors, especially when custom growing for an event.
How we lay out our crop planning
As I’ve mentioned, I’m not going to hand over a crop plan for you to copy but I will tell you how ours is set up, what we use to map out our crops along with some other details.
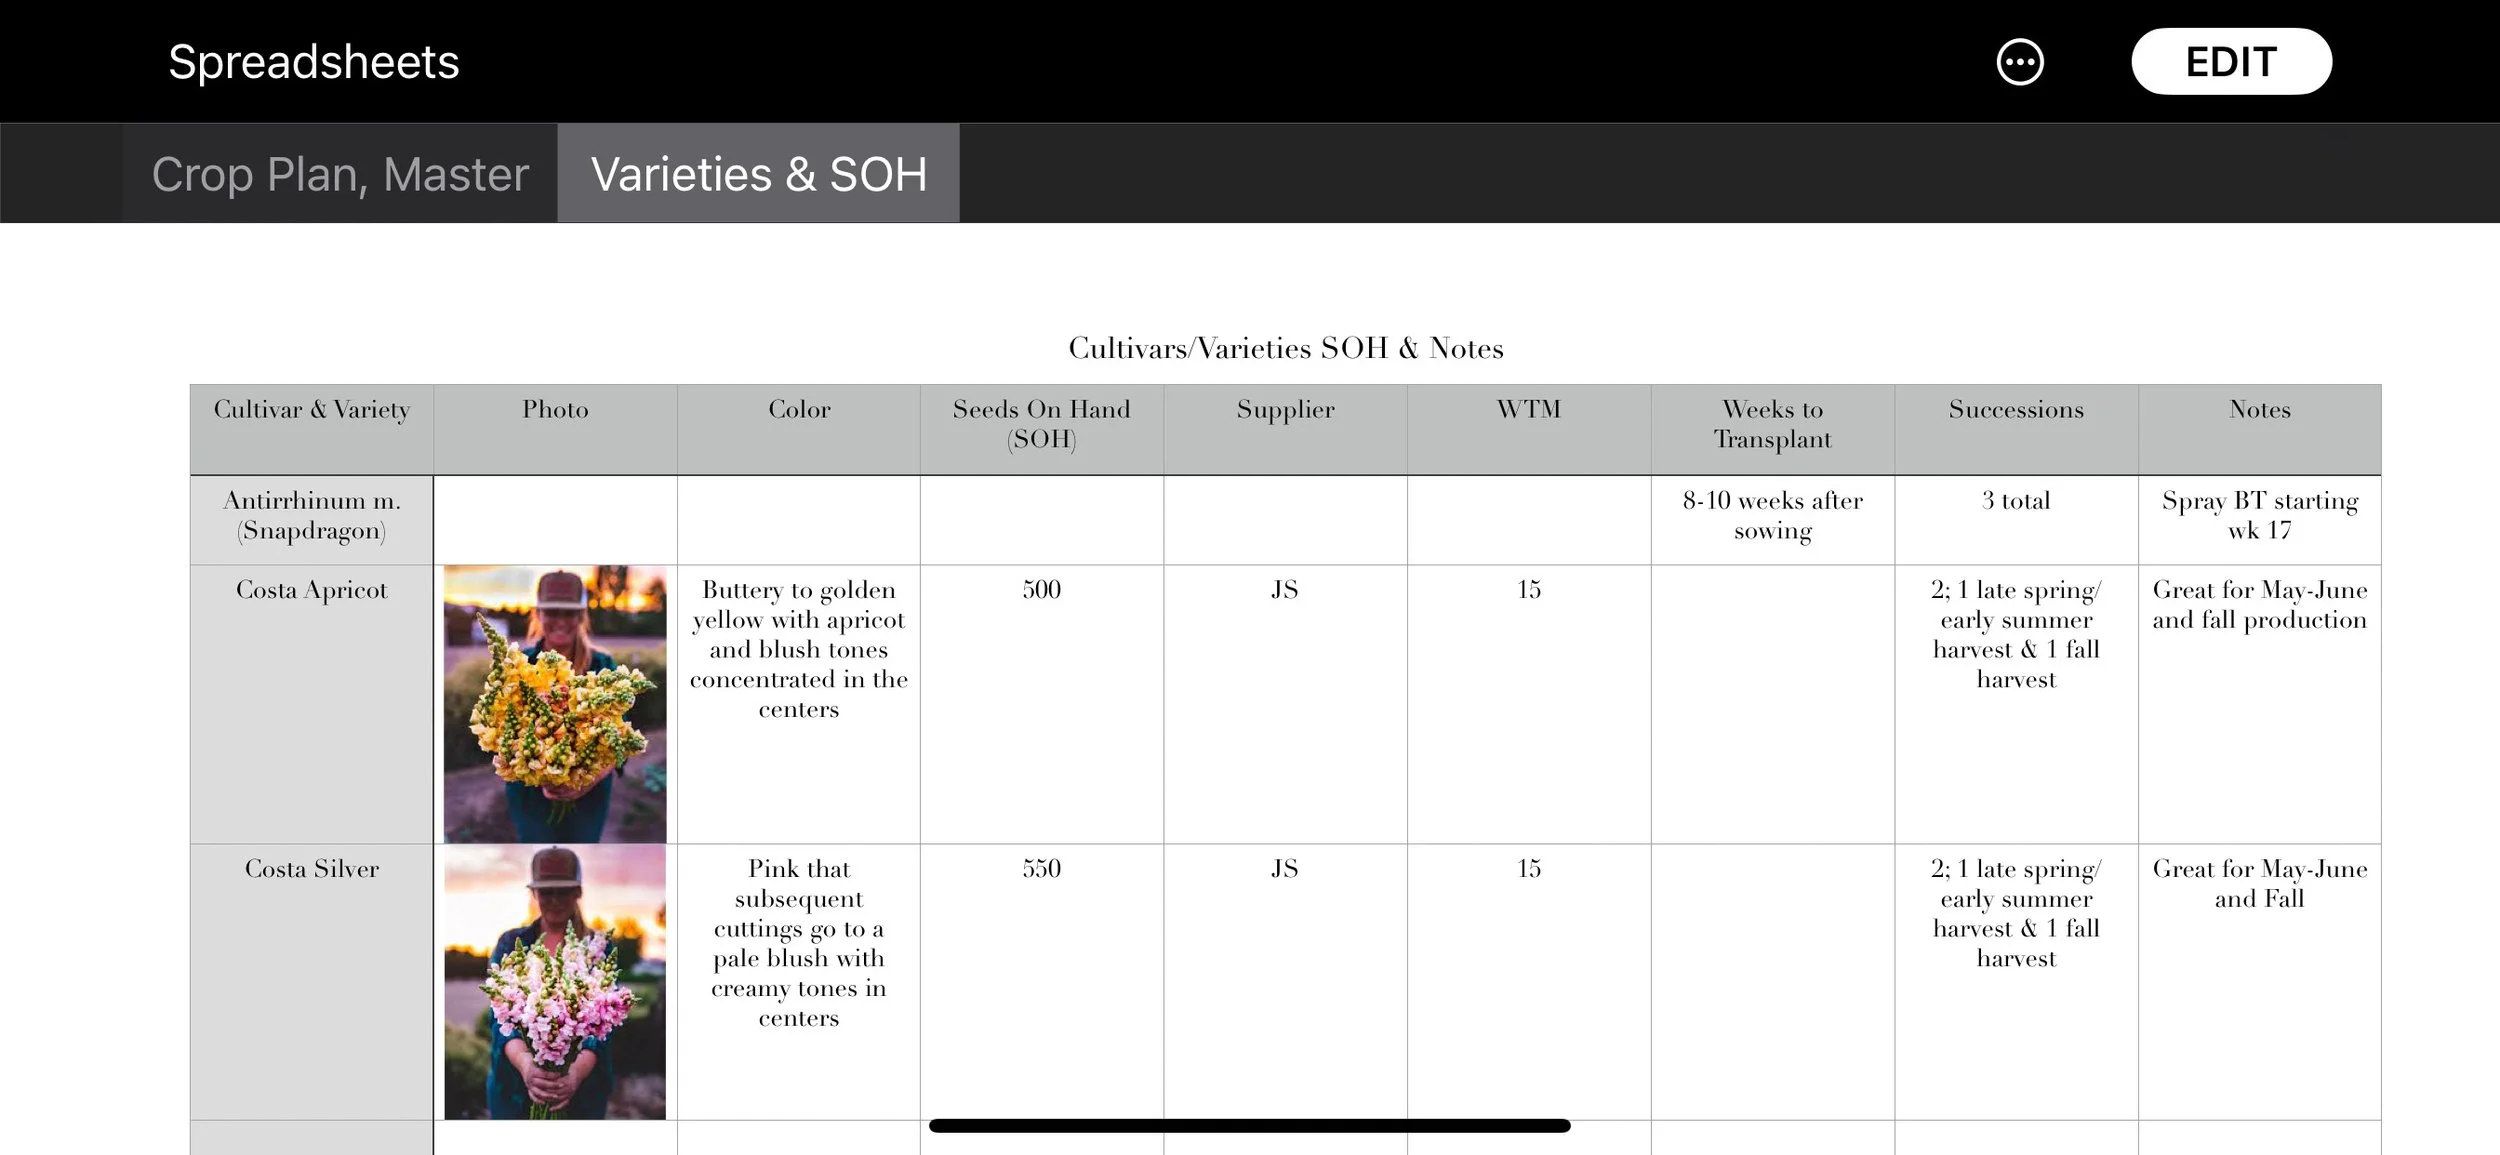
Each year, I create a new workbook with Numbers, which you could be fancy and use Excel instead if you prefer. I am a visual person and I love the ease of being able to click and drag photos of the different cultivars and their varieties on my “Varieties & Seeds on Hand” tab. This tab is where I list every cultivar and the varieties I grow. I keep key notes on varieties, have the color description, a photo as mentioned along with keeping seed inventory on hand with supplier information so I know if I need to reorder or if I spy a trend with some not great germination from a specific seed supplier. I also like to list Weeks to Maturity in it, which we will get into next along with how many weeks for transplant which just gives me a quick reference point while calculating sow dates, transplant dates and estimated harvest windows while crop planning.
The reason I like having the photos in my crop plan is for when I am specifically crop planning for an event. Having the photos allows me to better envision what cultivars and colors I have to work with. That’s just my little quirk, you definitely can just give yourself a color description and leave out the photos.
Aside from the Varieties & Seeds on Hand tab, I also keep sheets on all the different varieties that are not propagated from seed I have on hand such as dahlias, heirloom mums, peonies, etc. I am a forgetful person, having everything in the workbook with photos helps me remember what all I have on hand.
Outside of inventory, my work book also has our intended schedule, subscription member information, custom event crop planning and my master crop plan for cut flowers and the handful of vegetables we grow as well. I am not personally a fan of having a ton of different files, if I can have it one place that is my preference. Between my workbook and ASANA, that’s about all I use to keep my life together.
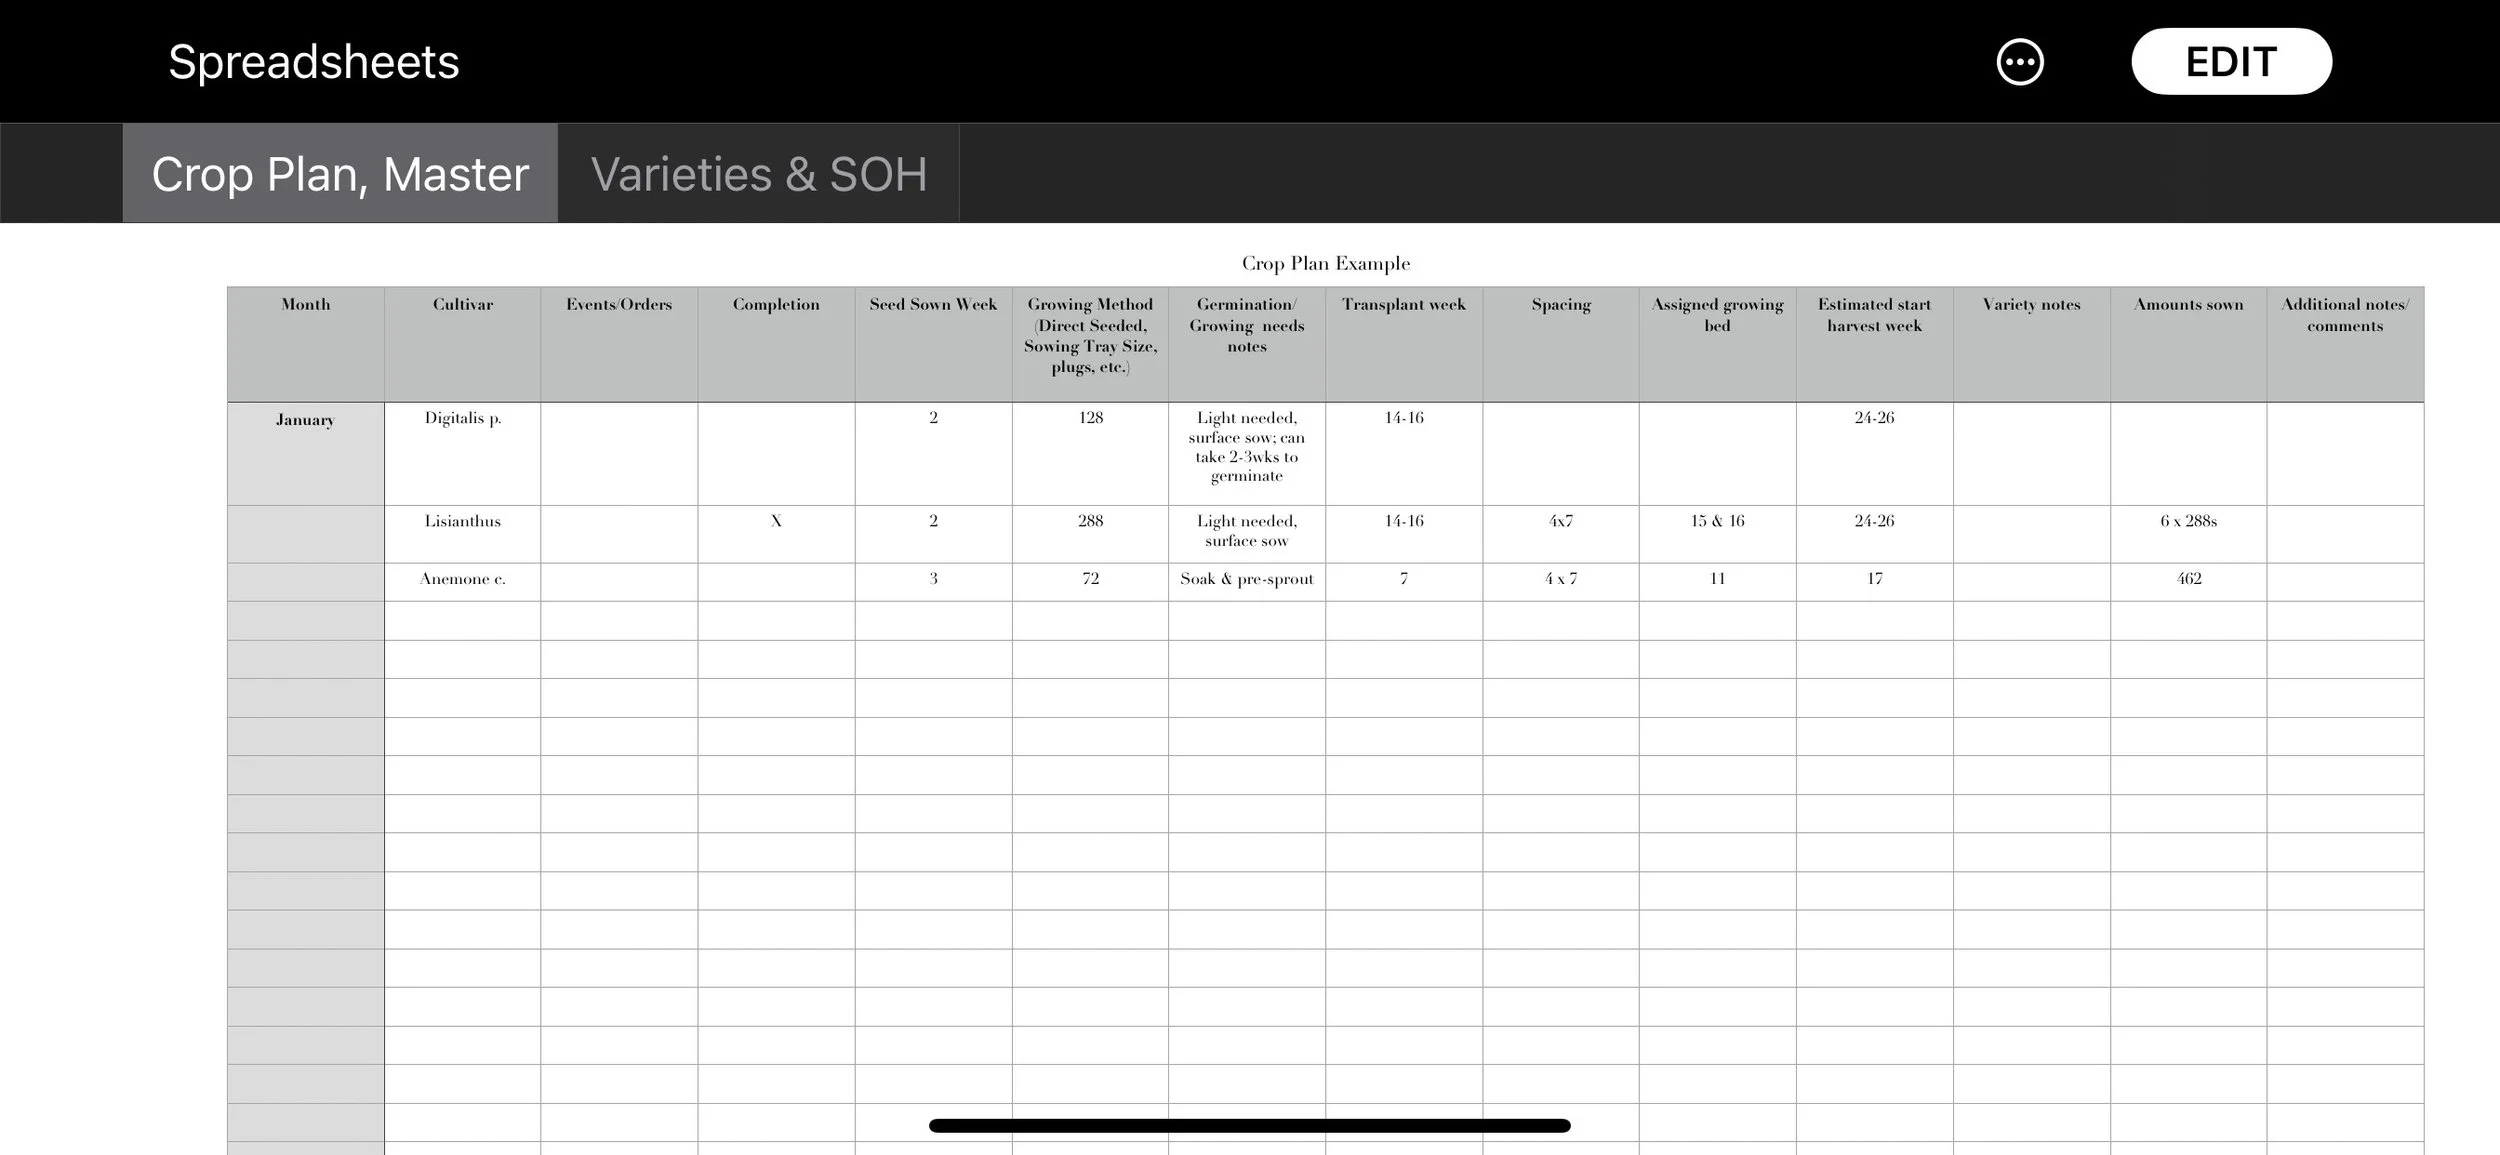
Above is an example of the layout we have in our master crop plan. Once again, if you subscribe to our Newsletter you have a download of this workbook available to you. Now, admittedly, I did not come up with this design or information all on my own. I have added details that I find helpful for myself but I actually credit Jennie Love with Love N Fresh Flowers after hearing her talk about her crop planning spreadsheet. I’ve tried various different ways and hers is what finally worked with my brain. Like most things, we’re not trying to reinvent the wheel, rather take what someone else already figured out and curate it to our business. Some of the information is already in my head, such as spacing, so not super needed but if I need an employee to pull something up, I wanted them to be able to have access to that information. Having an area for notes is essential because you need to start building your own historical data: what worked, what didn’t, weather patterns, pest pressure, not loved varieties, etc.
In it, I like to have the months in the first column, followed with cultivar, event/orders to make sure I don’t accidentally glance over an event, completion (because come March I start losing track of my mind), seed sow week. On the seed sow week, that is where the printout of the week number calendar is helpful and to make sure you are matching the months up with those week numbers as well. I also like to keep track of the methods I use to propagate those seeds, for transplants I like to know what cell sizes I used. The transplant week is the date that is ideal to get those plant babies out into the field. In there, I also like to have that estimated harvest week/window. From there, I can add notes later to see if my estimations added up. Keeping tally of amounts sown also reminds me of how many of each variety I actually have going and to be able to make sure I update my seeds on hand, in case I don’t get to it right away. I also like to log germination rates, since a majority of the packets don’t come with that information anymore and I’m too lazy to email and ask.
This crop planning spreadsheet example is the final product but first, we had to do a few things to get that crop plan up and running.
Some growers use formulas, I prefer to just manually input my information and dates. That’s just me, I feel each crop is too unique to fuss with formulas and the math is simple enough. Some things that may help you is the cheat sheet of DTM converted into WTM and noting crops that you will be transplanting and weeks needed for that etc.
The first task we did was to physically and visually map out our cultivars and varieties with their estimated harvest windows. This is where we’re a bit of a pen and paper type person. This is going to allow us to work backwards. Knowing when we want to have a specific cultivar to harvest then you can figure out your sow week. Subscribers, this worksheet is available as a downloadable for you as well.

This particular worksheet is something Graham concocted as a way to steer me away from just “winging it” when it came to crop planning.
How it works is we have the cultivars and the varieties we want then it’s listed against week numbers that also are coordinated with the associated months to make it easier to use.
First, we go through and highlight any target harvest windows. When highlighting, you can use one color or get really into it with giving certain succession rounds a specific color, whichever is your preference. This is where we start working backwards. We do this for each variety we want to have. Some have specific target harvest windows, some we just know are good crops to have for harvesting during a certain time frame.
For example, July is where sunflowers really shine for us while we wait for the dahlias to kick into gear and the spring beauties are done for the season. With knowing that, I realize I want to have sunflowers during the month of July to carry us through, so I would highlight the target harvest window for the specific varieties I want to grow to have for product. In early summer, I like to lean towards the lighter colored and cheery yellow sunflowers for July before moving onto the moodier colors of plum and red for late summer/early fall harvests.
Once I have the harvest windows all highlighted on the work sheet then we need to calculate for the seed sown week. We’ll show you how to calculate in the next section. Once I know my seed sow date, I like to highlight the box with a coordinating highlighter color and put an “x” in the seed sow box, that way I know it’s a seed sow date rather than a target harvest window (since things can start to get crowded once you get into peak season crop planning…).
At this point in our flower farming journey, we know what crops we typically have when, in other words we have our historical data. If you are leaping into your first year of flower farming or are adding new-to-you-cultivars you will be leaning on the information provided by the seed pack (or that fancy specialty cut flower book we talked about earlier).
Calculating seed sow weeks, transplant week and estimated harvest
Calculating using last frost range and transplant weeks
Now for the fun part, calculating when you will actually seed sow and transplant out your varieties. There are a couple ways you can take this. You can calculate your first and last possible sowings of a cultivar based on your last frost range and first frost range. Alternatively, you can also use a target window week number range. For our flower farming business, we utilize both. Mainly, our master crop plan is based on our frost ranges and historical data. We also use the target windows for more specific crops/color palettes for our event orders to ensure we are getting the correct colors/varieties that we want to potentially be able to use for the event.
If you are unsure about using target harvest windows when first crop planning, feel free to utilize your last and first frost ranges instead with transplant weeks.
For example, if week 21 you deemed is safe as far as frost goes, to transplant out cosmos you will use week 21 as your target week to transplant out.
Transplant Target Week based on frost range
21
Then you will need to calculate your seed sow week.
Transplant weeks for cosmos is four weeks.
Transplant Target Week - # of transplant weeks = Seed Sowing Week
week 21-4 weeks = 17 as the seed sow week
From there, you can calculate your estimated harvest window based on WTM which is about 15 weeks.
Seed Sow Week + WTM(DTM/7) = Estimated Harvest Week
17 + 15 = 32
You can bump that up or back a week to get your estimated harvest window, since nature never gives us exact harvest weeks.
Estimated Harvest Window = Weeks 31-33
Make sense? Oh, I hope so.
Calculating using first frost range and WTM
Your first frost date range will be used to calculate the last possible sowing you should do for that cultivar. When calculating your last sow date, you also want to give two to three week buffer for repeat blooming crops and about a week for single stem crops. You don’t want your plants just beginning to produce right when a fall frost can wipe them out, instead, they should be in their peak production.
First, you need to figure out your first frost range, which you should have already. For us, I know we tend to get a decent frost about mid-September most years. Some years it’s wiped us out, others it hasn’t. Our usual hard frost come about mid October. Our first frost range runs week 38 through week 41. I aim to have my more cold sensitive crops harvestable by week 37, knowing some I can hold in the cooler. This means, I use the first frost target window of week 37. Let’s use single stem sunflowers as an example.
First Frost Week = Week 37
Sunflowers, in peak growing period will bloom in typically in seven to eight weeks. For this example, given that the night temps would be cooling we’ll work with eight weeks as our WTM, knowing they could bloom sooner but I also know I can hold them in the cooler for a good two to three weeks.
WTM(DTM/7) = 8 weeks
Now calculate for seed sown date, our sunflowers are all direct sown so I’m not concerned with transplant week number.
First Frost Week - WTM = Last Seed Sow Week
37-8 = Week 29
In our example, Week 29 would be the last seed sowing I would do for single sunflowers for the season.
To calculate your seed sow date to hit your target window:
The Target Week, or what we prefer to look at them as: Target Windows. Whether you are looking to sell mixed bouquets at a farmer’s market or trying to hit a specific event date, you will calculate your seed sow week number and transplant week number similarly as we did using the last frost range.
Target Window Week Numbers - WTM (DTM/7) = Seed Sow Date Week Number
Seed Sow Week Number + # Transplant Weeks = Transplant Week Number
For example, let’s say you signed up to be a vendor at farmer’s market Week 27, which lands the first week of July. This is your Target Week Number.
Target Week Number
Week 27
Now, with target week numbers we should be looking at a Target Week Range or Window. You don’t want your crops just coming to maturity the week you are aiming to have the stems to sell. It usually takes a cultivar, especially one that’s a repeat bloomer, a good week or two to really get into peak production. Focusing on week 27 you target window will be weeks 25-28, which means sowing multiple sowings (successions) to make sure you have enough product for that first farmer’s market.
Target Week Window
Weeks 25 through 28
Let’s use the recipe I showed you earlier for a mixed bouquet for week 27 to figure out amounts, seed sow dates, transplant dates and how that would look in your spreadsheet. For this example, let’s say your wanting to bring at least 30 mixed bouquets to this particular market.
When it comes to using a target window, I rely on that more for weddings. Crop planning based of a target window is a lot of work. I wanted to show you how to do it so you have that in your toolbox. Ideally, working with your frost ranges and historical data paired with succession planting should keep you flush with blooms and not having to do this type of calculation often. Once you have your cultivars mapped out, you can use target dates to fill out any needed colors or potential gaps.

Using the cultivar selection worksheet in conjunction with your calculations should give you a nice visual to start seeing what crops you will have when. You can then begin filling in gaps with successions or some other varieties to make sure you have enough stems.
Getting how to do it? Just wanting to make sure you are understanding my ramblings and calculations!
You will also need to know your cultivars, if they are hardy or not and what temperatures they can handle when using the target week window approach to know if it realistic for you to have the cultivar harvestable for your target window. For example, even if a bride wanted dahlias in week 25 that’s not going to happen for our growing operation- they will have to settle for peonies.
Some years, it will get unexpectedly warm. Other years, it will be unexpectedly cold. So many things can happen that can either delay or bump up a harvest window on a specific crop, be aware of that and take it into account the best you can.
Now that you have the amount of growing space mapped out, the amount of crops you can fit in each row, your last and first frost range, your WTM, week numbers and your chosen varieties… it is finally time to pull it all together!
Putting it all together
Once you have your cultivar sheet all filled out, you can easily take it and begin inputting all the information into your crop planning spreadsheet. The nice thing about the way the spreadsheet works, you can work by cultivar or by harvest week number or seed sowing week number by the way you have the column organized. The reason I mention this part, I like to use that feature when inputting the subsequent successions for each cultivar. To learn more about succession planning read this blog.
Creating your crop plan is a ton of upfront work, especially the first time. The upside is: you should not have to rebuild it from scratch again. You should be able to duplicate your workbook and simply tweak it to all the nuances and such that you learned from the past season or specific events you have on the books.
Err of the side of caution by planning on crops earlier than exact or late
It is better to have blooms earlier and hold them in a cooler than have them bloom too late!
Whatever you are aiming as your target window whether it is for farmer’s market, an event date or simply wanting to launch your bouquet subscription: aim to have flowers harvestable at least one to two weeks sooner than you think you need them. A lot of times, I find once you get the ball rolling with harvests, with proper succession planting you always have something. Typically the first week or so of most crops, especially those varieties that are repeat bloomers, they aren’t quite hitting their stride as far as output. Aiming to have your crop hit maturity on the exact week you intend on selling them can leave you without enough product. Plus, many cultivars you can always hold in a cooler.
Don’t have a cooler? Don’t panic! It is well worth investing in something to be able to hold your blooms. Our early years, we invested in a deep chest freezer with an ink bird converter. It wasn’t an ideal situation but in the beginning years: we were able to store crops as we needed throughout the week (sometimes even weeks such as with tulips or peonies) to save up enough blooms for farmer’s market. A couple years ago we snagged a commercial fridge on good old craigslist since we outgrew that little freezer. It is absolutely okay to invest in smaller solutions, especially in the early years of flower farming, as your business earns a walk in cooler. This year we are looking forward to creating a mobile cooler to use for events as well. Back to that little freezer, from one week of sales at a farmer’s market (back when we had all of 1500 square feet TOTAL to work with) we were able to purchase that freezer and doubled our money back by the following week.
How much to grow?
If you have limited experience in growing and harvesting flowers, I would be really in conservative in your expectations of the amount of stems you will get per plant per week to harvest. Some single stems, are obvious: one seed = one stem. Other varieties, you can expect to get anywhere from 2-4 stems per week, depending on your harvesting schedule, plant health and storage capabilities. You will want to consider this while determining the amount of each cultivar you are planning on growing along with successions.
Unfortunately, I can’t give you an exact answer on how much to grow. I can suggest when seed sowing: sow 20-30% more than you think you will need for your final planting out. Overall, your space is going to dictate the amounts you can grow of each cultivar. If you are small scale, I would focus on higher production crops with a quicker turn around such as sunflowers and zinnias. We dive into this more in our succession blog.

Oh my! I think this is officially the most complex and longest post we’ve ever tackled and honestly: I don’t think we will ever have one to this level ever again.
You did it! You made it until the end.
Crop planning, like I said is an absolute beast of a topic to cover but is vital to being able to launch your flower farming season successfully. Mapping out your growing space, calculating those growing beds, knowing how much of each cultivar you can fit in each bed along with creating your master crop plan with all the details you may find you need to keep track of throughout the season. If you’re head is swimming right now: you are not alone! If it’s not, you must already be a pro at crop planning! Either way, take your time when it comes to crop planning. Make sure you have it fairly accurate so you don’t find yourself having to completely re-do everything from scratch ever, ever again.
Well, if you haven’t had enough of us, we will be doing a live stream on crop planning tomorrow Wednesday 1/19/22. Below this post I will link some blogs to keep you going along with the download page that has exclusive content for our subscribers. I do recommend printing out those goodies, if you are able, to have on hand during the livestream since we will be showing how to use them. If you have any questions, leave them in the comment section or feel free to ask during the livestream. Well, I’m going go do something not dealing with spreadsheets for a minute.
As always, we are looking forward to helping you hand blooms soon!
Jessica & Graham